![]()
Coppermine Photo Gallery v1.4.27: Documentation and Manual
About Coppermine
Coppermine Photo Gallery is an advanced, user-friendly, picture gallery script with built-in support for other multi-media/data files. The gallery can be private, accessible to registered users only, and/or open to all visitors to your site. Users, if permitted, can upload pictures with their web browser (thumbnail and intermediate sized images are created on the fly), rate pictures, add comments and even send e-cards. The site administrator determines which of the features listed above are accessible by registered and non-registered users. The site administrator can also manage galleries and batch process large numbers of pictures that have been uploaded onto the server by FTP.
Image files are stored in albums and albums can be grouped into categories, which in turn, can be further grouped under parent categories. The script supports multiple users and provides the administrator of the website with tools to manage which user groups can or cannot have personal albums, send ecards, or add comments. Users may also upload to public albums if the website administrator permits it. Permissions to create albums, upload and delete files are all determined by the website administrator.
Coppermine has an optional user selectable theme system with a number of themes pre-installed. It also supports the use of multiple languages and contains it's own language library. These language files provide, users of your gallery, access in their preferred languages. Coppermine uses PHP, a MySQL database, and either the GD library (version 1.x or 2.x) or ImageMagick to generate and keep records and file information of all thumbnails, intermediate, and full-sized images. Coppermine generates the html code necessary to display its various categories, sub-categories, albums, intermediate, and full-sized image displays dynamically. This drastically cuts down on the number of files and space your gallery would require using standard HTML. The install script (install.php) makes it quick and easy to get started.
Table of contents
- 2.2.1 Basic concepts
- 2.2.2 Initial configuration
- 2.2.3 Category, albums and file structure
- 2.2.4 Your admin account
- 2.2.5 Check uploads
- 2.2.6 Consider bridging
- 2.2.7 What are your visitors allowed to do?
- 2.2.8 Change your coppermine's design
- 2.3.1 Themes that come with Coppermine
- 2.3.2 Upgrading your custom theme
- 2.3.3 Content of a theme
- 2.3.4 The sample theme - a template to copy from
- 2.3.5 How the theme engine works
- 2.3.6 Creating your custom theme
- 2.3.6.1 Rename your theme first
- 2.3.6.2 Tipps & tricks
- 2.3.6.3 Using WYSIWYG-editors
- 2.3.6.4 Editing template.html
- 2.3.6.5 Template tokens
- 2.3.6.6 List of tokens in template.html
- 2.3.6.7 Modifying colors
- 2.3.6.8 Editing theme.php
- 3.1.1 Upgrading from version 1.0
- 3.1.2 Upgrading from cpg1.1.x, cpg1.2.x or cpg1.3.x to version cpg1.4.x
- 3.1.3 Upgrading from cpg1.4.0 (or better) to version cpg1.4.27
- 4.1 Categories, albums and files
- 4.2 Admin mode & User mode
- 4.3 The group control panel
- 4.4 The user control panel
- 4.4.1 Page controls
- 4.4.2 Searching for user(s)
- 4.4.3 Creating new users
- 4.4.4 Editing users
- 4.4.5 Group membership
- 4.11.1 Uploading pics by FTP / Batch-Add Pictures
- 4.11.2 Uploading by HTTP
- 4.11.3 Using Windows XP Web Publishing Wizard with Coppermine
- 4.12.1 General settings
- 4.12.2 Language & Charset settings
- 4.12.3 Themes settings
- 4.12.4 Album list view
- 4.12.5 Thumbnail view
- 4.12.6 Image view
- 4.12.7 Comment settings
- 4.12.8 File and thumbnail settings
- 4.12.9 Files and thumbnails advanced settings
- 4.12.10 User settings
- 4.12.11 Custom fields for user profile
- 4.12.12 Custom fields for image description
- 4.12.13 Cookie settings
- 4.12.14 Email settings
- 4.12.15 Logging & statistics
- 4.12.16 Miscellaneous settings
- 4.14.3.1 Uploading a plugin
- 4.14.3.2 Installing a plugin
- 4.14.3.3 Plugin Configuration
- 4.14.3.4 Uninstalling a plugin
- 5.2.1 Authentication by cookie
- 5.2.2 Standalone version first
- 5.2.3 Coppermine users, groups and pics uploaded by users are lost when integrating
- 5.2.4 Backup
- 5.3.1.1 choose application to bridge coppermine with
- 5.3.1.2 path(s) used by your BBS app
- 5.3.1.3 BBS-specific settings
- 5.3.1.4 enable/disable BBS integration
1. What is required
There are certain minimum requirements that need to be met in order to be able to install Coppermine:
1.1 Technical requirements
- A web server that supports PHP
PHP (version 4.2.0 or better), either compiled with the support for the GD library or permission to use the exec() function for the ImageMagick "convert" utility in order to make thumbnails and reduced size images. Mysql support needs to be compiled into PHP as well. - A MySQL database
You will need MySQL version 3.23.23 or better. MySQL 4.1 is recommended, MySQL 5 is supported. The MySQL user needs permissions to perform CREATE, ALTER, REPLACE, SELECT, UPDATE, DELETE, INSERT data from the database. Most users have these permissions when webhosted. If you don't have them, you will not be able to use this or any other pre-made scripts at all. If you are uncertain about your permissions, please check with your webhost. Most hosting services can probably tell you whether coppermine can or cannot be run on their servers.
A database needs to be set up that Coppermine can use - the install script will not create a database for you, but it will automatically create the tables and data structure in your database during install. In most webhosted environments, you will already have at least one database set up for you by your webhost. If not, you will need to create one. If you do need to create a database, check with your webhost on the proper procedures for doing so. Write down your database name, userID and password. You will require all three to successfully install Coppermine. - An image library:
Either GD version 1.x or 2.x (PHP has to be compiled to support it) or ImageMagick.
(see What's ImageMagick and What is GD) - It's always a good idea to contact your webhosting service first and ask them if they are aware of any known issues when installing Coppermine.
Although Coppermine can be run on any webserver that has the minimum requirements mentioned above, the Coppermine dev team can not support you on setting up your webserver in the first place. As suggested, those are requirements, i.e. they have to be met before actually considering to run Coppermine. Please note that the Coppermine group does not recommend self-hosting unless you're an experienced webserver administrator and know your way around.
1.2 Personal requirements
Coppermine is aimed at webmasters who have at least basic HTML know-how and some experience in setting up pre-made scripts. The Coppermine dev team is aware that there are Coppermine users who set up their gallery using auto-installers who have little or no experience in setting up similar scripts, which is fine as well. We just ask you to read the documentation thoroughly before asking questions on the Coppermine support board, as this should answer most newbie questions. You can use coppermine just fine using the pre-made themes that come with the coppermine package. However, if you want to modify existing themes or come up with a theme of your own (that matches the look of the rest of your site), you should have basic to intermediate HTML and CSS skills.
2. Installation and Setup
2.1 How to install the script
- Unpack the archive preserving the directory structure.
You can rename the coppermine folder, but not the files or folders within. - Upload all files onto your webserver (making sure to use the correct ftp mode)
- Set permissions on the "albums" and "include" folders in your Coppermine directory. Usually, you have to apply the CHMOD command, setting the permissions to 755 (or 777, depending on your server config). This step is very important and must not be overlooked!
- Ensure you have correct information about your database - you need to know the database name as well as the details of a MySQL user account with which Coppermine should connect to the database. The database and the username must already exist, and the user must have access to the relevent database. Coppermine will not create the database for you, but it will create the tables in the database during installation, there is no need for you to add any tables yourself.
- Run the install script on your server
Type the following URL into your web browser: http://your_server/coppermine_dir/install.php (your_server = your website, coppermine_dir = the folder in which you uploaded your Coppermine files.) Follow the online instructions on the install screen inserting the necessary information as requested.
- Confirm that you have all the correct information about the database that will be used for your Coppermine installation. If no database exists for your website, you will need to create one, or have one created for you by your webhost. Your webhost can best provide you with instructions on how to go about doing this. For installation purposes, you will need to know the path of the database server that you will be using with Coppermine and details of the MySQL user account through which Coppermine will connect to the server. You must have the database server path (usually 'localhost'), your MySQL username, MySQL password, and MySQL database name prior to installing Coppermine. The user installing Coppermine must have all relevant access rights to this database. If you are using a newly created database, there is no need for you to manually add any tables. Coppermine will create the necessary tables in the database during installation process.
- To run the install script on your server, type the following URL into your web browser: http://your_server/coppermine_dir/install.php (your_server = your website, coppermine_dir = the folder in which you uploaded your Coppermine files.) Follow the online instructions inserting the necessary information as requested.
2.1.1 Setting permissions
Coppermine needs write access to a number of files and folders on the webserver in order to accomplish the following:- during install, coppermine needs to create and write to the file "config.inc.php" in the "include" folder in order to store the necessary mySQL access data to run coppermine and to create and write the "install.lock" file, also in the same folder to prevent the installer from being run a second time after a successful install.
- when using http uploads, coppermine needs to write the files that are being uploaded into the subfolders that you or your users create in the coppermine albums folder
- regardless of the upload method, coppermine will create a thumbnail file and an intermediate file (if you have configured coppermine accordingly) and store it in a sub-folder in the "albums" directory, as well
- If you are going to enable logging at some stage, the script needs write access on the folder "logs"
- The "plugin" folder needs to be set to write access as well if you want to use the zip upload capabilities of the plugin manager
By default, files and folders on a webserver are usually not writable, so you will probably have to change permissions before installion, for the reasons mentioned above. It's really mandatory that you set/change (CHMOD) permissions - or you will run into issues sooner or later.
To be able to set permissions correctly, you have to understand how they work: there are read, write and execute permissions (abbreviated with rwx) for each folder and file. Permissions on a parent folder can propagate to a child folder or the files within it, but it's possible to tweak your setup so that unwanted permissions will not propagate to child folders and resident files.
However, there are differences between the different operating systems that are used as webservers. As a result, there are a number of different approaches. As coppermine is designed to run on many different setups, we've included some basic instructions. Those who know their way around may find these instructions somewhat generalized and lacking in details.
Note: it is not your local, client computer that matters, permission-wise, but, rather, the operating system used by your webserver. If you're not sure what OS your server is running on, try the CHMOD instructions first - most webservers run a version of Unix/Linux. If you can't figure how to set permissions properly, ask your webhost for support.
2.1.1.1 Apache on Unix/Linux (CHMOD)
- Basics
There are different flavors of Unix/Linux - all of them share a similar, somewhat common approach. In referring to this architecture, the word "Lunix" is used for both Unix and Linux derivates. "Read" permissions apply to files that are not actively run, but only being served, e.g text or plain html files. "Write" permissions are needed to dynamically create files, modify or delete them. "Execute" permissions are needed to run executable files, for example, script files like PHP. To serve web pages that are php-powered properly, the most basic permissions that are needed, therefore, are "read" and "execute" (abbreviated as r-x).
Possible permissions settings are:
- r-- ... read only
- r-x ... read and execute
- rwx ... read, write and execute
- Groups in Lunix
Lunix uses a set of three-group permissions, each of which can be applied independently. These are: owner, group and world. Using this set, you can dictate if a user who owns a file has permission to modify or delete it (write permission) while other users will only be able to read/view and possibly execute the file. On your server, these permission settings for the three possible groups are written in as a single line entry (in the order "owner", "group", "world").
Examples :
- rwxrwxrwx ... read, write and execute (rwx) permissions for all three groups
- rwxr-xr-x ... rwx permissions for the owner, r-x permissions for all others
- r-xr-xr-x ... read and execute permissions for all groups, only
- Webserver daemon
Even though you (the user who owns the files on your server and who has control over the permissions) may be able to access a file (e.g. using your FTP app), the coppermine script may not be able to do so. This is often caused by a particular setup option for servers: services (in Lunix often called "daemons") may run in the context of a specific user that is different from the user who is allowed to access the files. On many such servers, the webserver (apache) service runs as user "nobody". This way, the server can be protected against hacker attacks. Therefore, setting permissions on a server for the "owner" only does not work on these particular setups, you must set permissions for both "group" and "world" (at least for the group the webserver daemon is in). - Binary arithmetics
As you can see, permissions can be either "on" or "off" - this is the equivalent to the two different states that a bit of data can have in binary arithmetics (and therefore, also in the whole world of computing). As we have three types of different permissions (read, write, execute), we will need three bits to assign a set of permissions. The highest bit is the "read" bit - decimal "4" is used to represent it. The middle bit "write" is assigned to decimal "2", the lowest bit "execute" is represented by decimal "1". This may be a bit hard to understand or follow at first, especially if you haven't dealt with binary arithmetics before. If you would like to learn more, google for it. It's easier to understand if you look at some examples:
| permission | bit value | set? | value |
| read | 4 | 4 | |
| write | 2 | 2 | |
| execute | 1 | 1 | |
| sum (resulting byte value) | 7 | ||
| permission | bit value | set? | value |
| read | 4 | 4 | |
| write | 2 | - | |
| execute | 1 | 1 | |
| sum (resulting byte value) | 5 | ||
| permission | bit value | set? | value |
| read | 4 | 4 | |
| write | 2 | 2 | |
| execute | 1 | - | |
| sum (resulting byte value) | 6 | ||
- What good is all of this?
Instead of having to remember and write rwxrwxrwx for each file or folder in your setup, you can now write 777 in its place. The same applies for rwxr-xr-x, you can write 755, instead. - FTP application
Setting the permissions using your FTP application will be the option available for most users who are webhosted. Depending on the FTP app you use, the user interface will slightly differ: some apps will allow you to enter the CHMOD command by entering the numbers (777 or 755), others will provide you with checkboxes where you can tick the permissions separately for each group. More advanced FTP apps may even provide you with both mechanisms. As this documentation can't cover all individual FTP apps that are available, the exact method might differ a bit from what you have.
Your FTP app will probably have two windows, one showing your local files, the other one showing the files on your server. In the window that shows the remote files on the server, navigate to the folder your coppermine files reside in. Highlight the "albums" folder that resides within the coppermine folder. From the context menu (right-click!), choose "properties" (might be named "chmod" or similar as well). The permissions dialog will then pop up. Choose the proper permissions as suggested above (777 or 755, depending on your server setup). If you have a checkbox that enables the permissions to propagate for all sub-folders and files, tick it. If you don't have it, nevermind. Then click "OK" on the dialog box to apply the permissions. Keep in mind that your FTP app might not have the power to actually find out about the current permissions that are applied, so you mustn't trust the information displayed in the dialog box: even if it appears that the permissions are already set as needed, this may not be the case, so you should re-apply the permissions no matter what.
After having applied the permissions for the albums folder, do the same thing for the include folder that resides within your coppermine folder. - Website control panel
Some webhosts may not give you the option to access your site using FTP, or they may not allow your FTP client to execute the CHMOD command. If this is the case, you probably have a server setup interface (e.g. cpanel) to apply permission to folders and files. In fact, this doesn't matter, the method for applying permissions doesn't differ from the one described above in the section "FTP application": navigate to the albums folder and apply the permissions needed to give your webserver write access to all files and folders within the albums folder. Do the same thing for the include folder as well. - Shell access
If you have shell access to your server, you can apply the native CHMOD command on your files and folders. Go to your coppermine folder using your shell access, then apply the permissions to the albums and include folder and everything within it. As explained above, the user the apache daemon runs under needs write access, so you should CHMOD to 777 or 755, depending on your server setup.
2.1.1.2 Apache on Windows
You have to understand that there is no such thing as CHMOD on Windows operating systems - this command is available on Unix/Linux only, even if your FTP application displays a CHMOD option. If you try to apply CHMOD on Windows, the command will simply be ignored and do nothing. However, there are permissions on Windows as well.
The apache webserver service runs under a particular user - if you have full access to the server, check the services control to find out which one it is. If you can't do this, ask your webhost.
As a temporary workaround, set permissions on folder and file level as suggested in the section IIS on Windows, but not for the IUSR (which only exists on IIS), but for "everyone". However, allowing "everyone" to have read, write and execute permissions might be a security risk and is not recommended at all.
2.1.1.3 IIS on Windows
Pre-requisites: you will need full admin privileges over your server to execute this process. If you do not run the webserver yourself, your webhost has probably set up a web-based interface to let you change permissions. If you're not sure, contact your webhost.
The dialogs may differ slightly depending on the Windows version you have:
- Start Windows Explorer on your webserver and navigate to your coppermine folder
- right-click on the folder you want to change permissions for
- Choose "Properties"
- On the properties dialog, click on the "Security" tab
- Highlight the user "Internet guest account (hostname\IUSR_hostname). If it's not there already, use the "Add..." dialog to add this particular user
- Tick the "Allow"-checkbox for "Write"-access
- Click the "Advanced" button
- Just to make sure the write access propagates to all folders and files within the folder you're currently editing, tick the checkbox "Reset permissions on all child objects and enable propagation of inheritable permissions"
- click "OK"
- answer the confirmation dialog box that asks you if all permissions should be replaced with "Yes"
- depending on the number of child objects and your system's speed, wait until the permissions of all objects have been changed and the status window goes away.
- Click "OK" to close the permissions dialog
You have to understand that there is no such thing as CHMOD on Windows operating systems - this command is available on Unix/Linux only, even if your FTP application displays a CHMOD option. If you try to apply CHMOD on Windows, the command will simply be ignored and do nothing. However, there are permissions on Windows as well.
2.1.2 The install screen
| Your admin account | ||
| This section requires information to create your administration account. Use only alphanumeric characters. Enter the data carefully ! | Input an original admin username and password here. Make sure to either memorize it well, or note it down somewhere safe; you won't be able to administer your site if you lose this data. | |
| Username | This will be the username for your everyday administration of coppermine - choose one that you can memorize and enter easily. This entry is case sensitive so give special consideration when creating a username. Pics that you upload later under this admin account will display the name shown in the uploader field. Comments you make will also display this name, as well, for others to see. | |
| Password | This will be your admin password to your coppermine install. Don't use trivial, overly abused passwords - if an attacker figures out your password, s/he will be able to hack your entire site! Use a combination of upper and lower case letters and numbers like "j3e4N5n6yG". Remember, passwords like your admin username are case sensitive. Be careful when creating your password. Write it down and keep it safe, preferably somewhere away from your computer. | |
| Email address | This email address will be used to send emails from the webserver (e.g. the registration email, notifications and ecards). Make sure that it is a valid email address. | |
| Your MySQL configuration | MySQL is the type of database service that is available on most webservers. If you don't have it, you cannot install it. That is, unless the server is yours to administer. If you are webhosted, you are probably out of luck. It's mandatory to have a mySQL database to run Coppermine or any other PHP-based script. You can not fake the mySQL information during install, you must know it before hand, and enter the information as required. If you're not sure about the information required, ask your webhost. | |
| This section requires information on how to access your MySQL database. If you don't know how to fill them, check with your webhost support. | ||
| MySQL Host (localhost is usually OK) |
||
| MySQL Database Name | Coppermine will not create this database for you - it must exist prior to any attempt at installing coppermine. (If you do not have a pre-designated database, you will have to create one, provided you have the authority on your site to do so). | |
| MySQL Username | The mySQL user name does not have to be your coppermine admin username, nor is it the necessarily the same as your FTP username (although this can be the case for some users, but only by sheer coincidence or deliberate intention, to simplify site administration). The mySQL user needs the permissions CREATE TABLE, INSERT, ALTER, UPDATE, DELETE, SELECT. |
|
| MySQL Password | The password that goes with your mySQL username. | |
| MySQL table prefix (the default value is OK; do not use dots!) |
Coppermine's tables can co-exist in an existing database which has tables used by other applications. All coppermine tables will be using a different prefix from these, as specified here. You can even have several coppermine installs using one database - only the table prefixes have to differ in each case. Unless you know what you are doing, don't change the default value. | |
| ImageMagick | You can not fake an ImageMagick path, you have to know it. If you're not sure, leave this field empty - Coppermine will then try to use GD by default. You can edit the path later as well in the config screen. You can only install ImageMagick or GD if the server is yours to administer - if you're webhosted, you probably can't. The user of the webserver, who wishes to use ImageMagick, will need read/write/execute permissions in the folder where ImageMagick's convert executable resides in. | |
| Coppermine can use the ImageMagick 'convert' program to create thumbnails. Quality of images produced by ImageMagick is superior to GD1 but equivalent to GD2. If ImageMagick is installed on your system and you want to use it, you need to input the full path to the 'convert' program below. On Windows the path should look like 'c:/ImageMagick/' (use / not \ in the path) and should not contain any space, on Unix is it something like '/usr/bin/X11/'. |
||
| ImageMagick path | ||
| After having entered all required data, click this button to submit the form | ||
2.1.3 What the installer does
After performing some basic checks, the installer creates the needed database tables for you and fills them with default values. It creates the file include/config.inc.php within the coppermine folder on your server that stores the database details you entered during install. If you should change your mysql database details later (i.e. if you change the password of your mysql user account or if you migrate your gallery to another server), you will need to edit include/config.inc.php manually to reflect the changes. The file include/config.inc.php also keeps the install script from being run twice: if the installer is run, a check is performed wether the config file exists - if yes, the installer will stop and redirect the user to the index page.
2.2 Getting started
Use the "Album Manager" ("Albums" link in the admin menu) in to create and order your albums. You'll need at least one album your files can go into.
Use the anonymous group to define what non-registered users can and can't do (in the groups panel).
Use the properties of an album to modify its description and permissions.
In order for a user to be allowed to upload a file in album two conditions must be met:
- The user must be part of a group that can upload files.
- There must be at least one album where "Visitors can upload files" has been set to "Yes",
OR
The user has created an album in the 'user galleries', if allowed.
The same applies to picture rating and comment posting.
If you have installed the script succesfully but are having trouble getting it working properly you can enable the "debug mode" on the Config page. In this mode, the script outputs most of the warning/error messages produced by PHP in addition to some debug information. This can provide valuable information to understand what is wrong.
2.2.1 Basic concepts
Of course you're exited about Coppermine and want to start with it right now. However, there are some basic considerations you should make up your mind about first, as some settings can't be changed easily once your gallery has been populated with content.
So this section is meant as a guide once you've finished installing Coppermine. Go through it carefully to avoid issues that may turn up later.
- Initial configuration
Settings you should edit immediately after finishing the install - Category/album/file structure
Understand how Coppermine organizes navigation and storage of individual files - Your admin account
- Check uploads
Make sure uploading works as expected before letting in visitors - Consider bridging
Bridging later when you already have users might get difficult - What are your visitors allowed to do?
What level of user interaction are you going to allow? - Change your coppermine's design
2.2.2 Initial configuration
There are some settings in Coppermine's config that you should edit right after finishing install.
Log in with the admin username and password you set up during install, click on the "Show admin controls" link if it is visible, go to the Config page and start to configure your gallery. Note that even if you are a member of the administrator group, you need to be have "Show admin controls" enabled. In previous versions, this used to be named "admin mode", but was renamed because some people thought that switching from admin mode to user mode showed them what regular users can see (which is not the case).
There are some settings in config that can't be changed later (if there are already files in the database) - make sure to set them up correctly in the first place. Although you'll surely want to start using coppermine immediately it is advisable to configure those settings (marked with an asterisk "*") properly at the very beginning.
2.2.3 Category, albums and file structure
The Coppermine Photo Gallery works in the following way:
- Files are stored in albums
- Albums are organised in categories
- Categories can be nested (into subcategories)
If you don't plan to have many albums, you really won't need to use the categories feature. If this applies to you, simply do not create any categories and all your albums will automatically appear on the main page of the script.
There is, however, a special category named "User galleries". This category can't be deleted. If a user belongs to the group "can have a personal gallery" and this is set to YES, he will have the right to create his own albums and his gallery will be a sub-category of "User galleries". This link is not visible to visitors of your site, however, if you do not allow users to upload pics and have their own albums.
The administrator can create albums in any category. Non-administrative users can only create albums in the "User galleries/Their_username".
You can, however rename the "User Galleries". To rename the "User galleries" category and description, simply go to your category control panel and change the name there (e.g. to translate the words "User galleries" into your language).
2.2.4 Your admin account
It's mandatory to have your admin account configured properly and to memorize the admin account data. Coppermine even provides you with the option to retrieve a lost password, but for this, you have to configure an email address for every account. When users sign up, they have to enter an email address, so this should not be a problem. However, the admin account that you created during setup doesn't have an email account yet. You should go to your profile when logged in as admin and specify a valid email address for the admin there - this way, you can later request a new password if you forget it.
2.2.5 Check uploads
Before actually promoting your coppermine gallery publicly, you should make sure that uploads work as expected, as they are the most common issues users have, caused by the huge amount of factors that have to be taken into account. Review the upload troubleshooting section if you have issues.
2.2.6 Consider bridging
Coppermine was designed to be used as standalone application in the first place. However, many people wanted to integrate it with another app, so starting with cpg1.1.x coppermine came with a mechanism that allowed users to bridge coppermine with another app in terms of user management. The main advantage is giving your site visitors a single sign-on for your overall site (e.g. both in your gallery and your forum), so they don't have to sign in twice and memorize two different logons.
Bridging does not integrate coppermine visually into your home page (you have to create a custom theme to accomplish this).
You can enable (or disable) bridging at any time, but you should make up your mind on bridging when installing Coppermine in the first place, because there are some issues that have to be taken into account: if you already have users inside your coppermine database when enabling bridging, the correlation between those initial coppermine users and the "new" users from the app you bridge with gets lost. As a consequence, there will be no more correlation between things your "old" users did (uploading pic, posting comments etc.) and the "new" users from the bridge.
To circumvent those future issues, you should make up your mind when installing coppermine: do you want to allow user interaction? Do you plan to offer a bulletin board later (or any other application that keeps track of users)? If your answer is "yes", or "maybe", then it's advisable to enable bridging before actually promoting your site publicly and starting to let users in.
Read up details in the bridging section of the docs.
2.2.7 What are your visitors allowed to do?
Coppermine can be used for a variety or purposes: some use it to display their personal files to everyone on the internet, others want only a limited number of users to be able to access the site for viewing only and no interaction at all. A large number of webmasters want to create a community site, where users can participate by uploading files, comment on other's files and rate them.
You can use Coppermine in all those setups (and a mixture of it), but you should be aware of the possibilities and limitations first:
Users "inherit" their permissions from the group they're in. That's why many settings in Coppermine are set per group. This way, you can have several levels of permissions. Set permissions by group using the group control panel
2.2.8 Change your coppermine's design
You can change some layout and design aspects (e.g. displaying random thumbnails on the index page) in the corresponding config section. Coppermine comes with a theme engine that allows you to customize the look of your gallery. You can choose one of the themes that come with Coppermine or you can download user-contributed themes from the downloads section of the Coppermine homepage. Based on the available themes you can customize your individual theme to make your site look unique and make your gallery match the overall look of your site.
2.3 Creating or upgrading your own themes
Coppermine comes with a powerful engine that allows you to create your own theme, giving your gallery a unique look that matches the overall layout of your entire site. Other applications call them "skins" or "templates", well call them "themes".
There is a (constantly growing) number of user-contributed themes that can be previewed and downloaded from the Coppermine web site.
-------------------------------------2.3.1 Themes that come with Coppermine
The Coppermine package comes with some pre-made themes:
- Classic
The default theme with white background and a horizontal menu - Eyeball
A theme with a dark background and a horizontal menu that expands for user interaction features - Fruity
A colorful theme with a vertical menu on the left - Hardwired
A theme with a dark background and a smallish font size that works well for narrow space and smaller resolutions. Comes with two horizontal menus - IGames
A dark theme with 3D-effects and a horizontal menu - Mac OX X
A theme with light background and an expanding horizontal menu that resembles the look of a Mac - Project VII
A theme with white background featuring a horizontal expanding menu - Rainy Day
A theme with dark background and rounded edges - Sample
The sample theme would look identical to the classic theme. It will not be displayed using the theme selector - it is just meant as a template to copy from when creating or modifying your own theme. - Waterdrop
A theme with a light background and a "conventional" horizontal menu
2.3.2 Upgrading your custom theme
To upgrade an existing custom theme from cpg1.3.x to version 1.4.x, read the theme upgrade documentation.
You only have to upgrade your custom theme when upgrading between major versions (e.g. from cpg1.3.x to cpg1.4.x), as from one major version to the next, the theming engine is subject to changes. When only upgrading from minor versions to the next (e.g. from cpg1.4.x to cpg1.4.y), you don't have to update your custom theme.
The core themes that come with Coppermine packages don't need to be updated, as they should be replaced during the upgrade and therefor will contain all needed changes. However: if you have based your custom theme on one of the core themes that come with coppermine (e.g. the classic theme), pay attention to possible changes. As suggested below, it's advisable to rename your custom theme to make sure that it doesn't accidentally get overwritten when upgrading.
2.3.3 Content of a theme
Coppermine themes are stored in the "themes" directory, each consists of 3 primary files :
- "template.html" the main template in plain HTML.
- "style.css" the stylesheet associated with the template
- "theme.php" the PHP theme file
Additionally, there usually is a folder named "images" that resides within the theme folder (themes/theme_name/images/) that contains the images used by the particular theme (logos, bullets, backgrounds and other graphical resources needed).
2.3.4 The sample theme - a template to copy from
Your Coppermine installation also includes a "sample" theme directory. The "sample" theme includes each of these files but does not show up in the user selectable list of themes in your Coppermine display. Sample's theme.php also holds a copy of every themeable function and template for your reference. If you opt to use the "sample" theme to begin creating your own theme, you should follow the theme.php instructions in the "theme upgrade documentation" and begin with a blank theme.php.
To clarify: you mustn't edit the sample theme (as it will not be displayed), but copy the sections you want to see changed from it into your custom theme. Don't copy the whole content from themes/sample/theme.php into your custom theme, as this will only clutter your custom theme and will make upgrading very hard in the future. Instead, copy the sections you want to modify.
2.3.5 How the theme engine works
When a Coppermine page is being parsed, the core code will call theme functions. If those functions exist in your custom theme, they will be taken into account. If a particular function does not exist in your custom theme, the core function will be used. The core functions (the default theme behaviour if you want to put it that way) reside in includes/themes.inc.php. Therefor, you mustn't edit includes/themes.inc.php, under no circumstances, as all your changes will be lost when upgrading in the future. Everything that possibly could be accomplished by editing include/themes.inc.php can be accomplished by editing themes/yourtheme/theme.php as well - stuff defined in your custom theme will take precedence over the core theme functions.
2.3.6 Creating your custom theme
2.3.6.1 Rename your theme first
To create a new theme, the best solution is to use an existing one as its copy template. To do that, make a copy of the folder of the theme you want to use as a basis. Then edit the "template.html", "style.css" and "theme.php" files and replace all occurences of "themes/old_theme_dir" with "themes/new_theme_dir" in order for the links to point to the correct place.
Avoid using spaces and special chars in your custom theme name - only use alphanumerals and the underscore (_).
Also keep in mind that despite this file being located in the "themes/your_theme_dir" directory, it must be coded as if it was in the main directory of the coppermine installation. For example, in order to display an image, you must use <img src="themes/theme_dir/images/image.gif" alt=""/> and not just <img src="images/image.gif" alt=""/>. The same principle applies for the "theme.php" file.
Example:
- Create a copy
Browse the local coppermine gallery copy on your client, navigate to the themes folder (your_coppermine_folder/themes/), right-click on the folder name that represents the theme you want to base your custom theme on (in this example, we will use the classic theme, so we will use your_coppermine_folder/themes/classic/), select "copy" from the context menu. Then paste the content of the clipboard into the themes folder; a folder (named "Copy of classic" or similar) will turn up. - Rename the folder
Right-click on the newly created folder (your_coppermine_folder/themes/Copy of classic/) and select " rename" from the context menu. Choose a unique theme name - in this example, we will use "my_theme" (resulting in the folder to be renamed to your_coppermine_folder/themes/my_theme/).
Keep in mind that we will upload the theme to your webserver later - you will have to make sure to properly use capitalization: on Windows-driven clients, capitalization does not matter, so there is no difference between "My_theme" and "My_theme". Most webservers are Linux-driven though, where capitalization does matter (there is a difference between "My_theme" and "My_theme"). To be safe it is recommended to use lower case to stay out of harms way. - Edit the files to reflect the theme name
Use a plain text editor (in this example, we will use notepad.exe), open your_coppermine_folder/themes/my_theme/template.html. Find "themes/classic" and replace with "themes/my_theme" (may exist in the file several times, so make sure to replace all occurrences of "themes/classic" with "themes/my_theme"). Save your changes. Then do the same thing for the files theme.php and style.css.
It is strongly recommended to rename your custom theme as suggested above, even if you only plan to accomplish minor changes to a default theme that coppermine comes with. The reason is quite simple: when upgrading at a later stage, you will not run into issues (e.g. accidentally overwrite your customized theme with an updated default theme).
2.3.6.2 Tipps & tricks
If you're not sure how to go about creating your own theme, you could also have a look at the download section of the coppermine homepage: there are many user-contributed themes available for download that can be previewed on the coppermine demo page.
While you're in the process of creating or testing a new theme, you might not want your theme to be displayed to visitors of your site, but you (as the coppermine admin) may want to still be able to preview your theme. To do that, simply add theme=your_theme_name to the url in your browser.
- http://yoursite.tld/coppermine/index.php?theme=your_theme_name will show the coppermine index page, using your theme
- http://yoursite.tld/coppermine/thumbnails.php?album=1&theme=your_theme_name will show the thumbnail view of album 1, using your theme
- http://yoursite.tld/coppermine/?theme=xxx will reset your view back to the theme you chose as your default theme in coppermine config
2.3.6.3 Using WYSIWYG-editors
If you are using an HTML editor to design your template, the easist working solution might be to save the "template.html" file into the main directory of your coppermine installation and edit it there. Whenever you load Coppermine, if the script finds a file named "template.html" in the main directory it will load it instead of the default one that you assigned in the CONFIG menu. Once you have finished editing your theme be sure to move the file back into the directory it belongs. Don't forget to remove the temporary template.html file from the Coppermine root folder once you are done editing!
It is strongly recommended not to use a WYSIWYG-editor at all to edit Coppermine files. The coppermine dev team is aware that it might seem easier for beginners to use those graphical editors. However, they have some major drawbacks:
- Some editors (mostly MS Frontpage) are notorious for "beautifying" the code in a manner that renders embedded PHP code invalid. Subsequently, if you use a WYSIWYG-editor to edit theme.php, the file may get corrupt (i.e. un-usable)
- Graphical editors tend to create deprecated, invalid, proprietary HTML. You have more control if you use a plain text editor instead.
- You don't learn anything. Sooner or later, you will want to do something your precious WYSIWYG-editor isn't capable to do. Now what? You have always used the editor to do your work - you don't understand HTML. When using a plain text editor, the learning curve may be steep, but it's much more entertaining.
2.3.6.4 Editing template.html
The file template.html is the core file of each theme: it can only contain HTML/CSS/JavaScript code (no PHP!) plus some placeholder tokens that will get replaced with content when the theme is being parsed (i.e. when the HTML output of a gallery page is being generated). Template.html determines the overall layout of your gallery pages. Use it to make your gallery match the overall look of your entire website.
2.3.6.5 Template tokens
When editing the "template.html" file do not remove the elements between {} - these are the placeholders used by the script. Think of those items in curly brackets as placeholders that will be replaced later with dynamic content when your template is being parsed. You can move the placeholder tokens around to obtain different layouts. However, you have to understand that the {GALLERY}-token is a special placeholder: think of it more as a separator than an actual placeholder token. When the template is being parsed, the {GALLERY}-token will be replaced with the actual core component of the gallery. Other placeholders tokens in curly braces that come before the {GALLERY} token are being handled by the pageheader function; placeholder tokens that come after the {GALLERY}-token are being handled by the pagefooter function. Therefor, you have to keep in mind that you can freely move tokens around in template.html as long as you don't reverse the position of the token you move and the {GALLERY}-token.
2.3.6.6 List of tokens in template.html
| Token | Description | Default position | Needed? | Dependancies |
|---|---|---|---|---|
| {LANG_DIR} | Language direction Possible values are LTR and RTL. Should not be changed or modified at all. |
pageheader | mandatory | Filled by Coppermine, depending on the orientation of the language the end user has chosen |
| {CHARSET} | Character set Determines the character set used - filling the HTML tag . Do not change unless you really know what you're doing. |
pageheader | mandatory | Filled by Coppermine, depending on the encoding the admin has chosen in config. |
| {TITLE} | Page Title The page title that is mainly taken into account by search engines. The human visitor sees the title tag in the browser window. |
pageheader | mandatory | Title tag is being composed in the individual coppermine core file (e.g. displayimage.php, thumbnails.php etc.), handed over to the pageheader function. |
| {META} | Meta tags Meta tags that depend on the dynamic content of a page are being inserted here. Currently, Coppermine uses the keywords meta tag (<meta name="keywords" content="DYNAMIC CONTENT HERE" />) and the refresh meta tag (<meta http-equiv="refresh" content="5; URL=REDIRECTION_PAGE" />). If you want to add other meta tags (e.g. author meta data like <meta name="author" content="Firstname Lastname" />), do not replace the token, but add your custom meta tags below the {META}-token. |
pageheader | mandatory | Populated dynamically by the script, e.g. for meta keywords based on file keywords or for redirection for status change screens. |
| {CUSTOM_HEADER} | Custom Header If the corresponding option has been set in config, this token will be replaced with the output that your custom header generates. If you don't use the custom header feature, you can remove the {CUSTOM_HEADER}-token from your template, but it's advisable to leave it in place if you decide to use the feature later. |
pageheader | optional | Path to custom header include set up in config |
| {GAL_NAME} | Gallery name Will be replaced with the gallery name you set up in config when the template is being parsed. You might want to remove this token, especially if you already have a banner in your theme that displays your gallery name. |
pageheader | optional | Gallery name set in config |
| {GAL_DESCRIPTION} | Gallery description Will be replaced with the gallery description you set up in config when the template is being parsed. You might want to remove this token, especially if you already have a banner in your theme that displays your gallery name. |
pageheader | optional | Gallery description set in config |
| {SYS_MENU} | System menu Determines the position of the first level menu the end user will see on your page (the one that contains the login/logout link). Even if you want to get rid of the menu or parts of it, do not remove the {SYS_MENU} token itself, but remove the menu items you don't want displayed by editing theme.php instead. |
pageheader | mandatory |
|
| {SUB_MENU} | Sub menu Determines the position of the second level menu the end user will see on your page (the one that contains the links "Album list" / "Last uploads" / "Last comments" / "Most viewed" / "Top rated" / "My Favorites" / "By Date" / "Search"). Even if you want to get rid of the menu or parts of it, do not remove the {SUB_MENU} token itself, but remove the menu items you don't want displayed by editing theme.php instead. |
pageheader | mandatory | n/a |
| {LANGUAGE_SELECT_FLAGS} | Language selector (flags) Will display a row of flags representing the languages available for the end user to choose if corresponding config setting is enabled. |
pageheader | optional | Display language flags enabled/disabled in config. |
| {LANGUAGE_SELECT_LIST} | Language selector (list) Will display a dropdown list of languages available for the end user to choose if corresponding config setting is enabled. |
pageheader | optional | Display language list enabled/disabled in config. |
| {THEME_SELECT_LIST} | Theme selector (list) Will display a dropdown list of themes available for the end user to choose if corresponding config setting is enabled. |
pageheader | optional | Display theme list enabled/disabled in config. |
| {ADMIN_MENU} | Admin menu Displays the admin menu. |
pageheader | mandatory | Admin must be logged in. Admin controls mustn't be hidden. |
| {GALLERY} | Gallery |
n/a | mandatory | |
| {CUSTOM_FOOTER} | Custom Footer If the corresponding option has been set in config, this token will be replaced with the output that your custom footer generates. If you don't use the custom footer feature, you can remove the {CUSTOM_FOOTER}-token from your template, but it's advisable to leave it in place if you decide to use the feature later. |
pagefooter | optional | Path to custom footer include set up in config |
| {VANITY} | Vanity block If your custom theme is defined as valid theme and you have enabled the corresponding option in config, the {VANITY}-placeholder will be replaced with mini-banners that link to PHP.net, mysql.com and the HTML and CSS validators of the W3C. |
pagefooter | optional | Display the vanity block on themes that are defined as XHTML and CSS compliant enabled in config. Theme defined XHTML and CSS compliant in theme.php |
2.3.6.7 Modifying colors
To modify the colors, fonts, font sizes, etc... used by the script, you should edit the "style.css" stylesheet whenever possible. For example, if you want to increase or decrease the size of the fonts you can simply modify the line with : table { font-size: 12px; }. Most of the font sizes used by the script are defined as a percentage of this size.
2.3.6.8 Editing theme.php
The "theme.php" file contains all the HTML templates used by the script. You can edit them, as well. When making modifications to these templates, be careful that you do not alter the lines that start with <!-- BEGIN xxx --> and <!-- END xxx -->. These lines are often used to identify the start and end of specific code blocks that the script will use to display your gallery.
2.4 Safe mode issues
A significant number of webhosts on the Internet run PHP in safe mode. Coppermine runs without any problem in safe mode and with the "open basedir restriction" active, provided safe mode is properly configured. Unfortunately, on many hosts, safe mode is not configured properly.
If your webhost is running PHP in safe mode but is misconfigured, you may need to do the following :
- With a FTP program, change the mode of Coppermine's "include" directory on your server to 0777.
- Do the same for the "albums" and "userpics" directories.
- Check that at the beginning the the "include/config.inc.php" file, you have a line with : "define('SILLY_SAFE_MODE', 1);"
2.5 Using SMTP to send emails
By default the script uses the PHP built-in mail function to send emails. In some cases, the PHP built-in function can't be used.
If, in order to send emails with PHP, you are required to supply a hostname, a username and a password, you will need to edit the CONFIG menu section "Email settings" and insert the correct values there. If you don't need a username and password to connect to your SMTP server, just leave these lines blank. If you don't know what settings to enter, you will need to check with your webhost.
3. Upgrading
3.1 Upgrade steps
3.1.1 Upgrading from version 1.0
If you already have installed version 1.0 and you want to transfer your albums to version 1.4x follow the following steps:
- First, make a backup (dump) of your database.
- Install version 1.4.x as you normally would but in a directory different from the one where you v 1.0 is. Note that in order to use the upgrade script, tables for version 1.0 and 1.4.x must be stored in the same database.
- Copy the "albums" directory of version 1.0 into the directory where you installed version 1.4.x
- The upgrade script assumes that you used the "CPG_" prefix for tables (default value) when you installed version 1.0, if this is not the case, edit upgrade-1.0-to-1.2.php and edit the $prefix10 variable.
- Login to your 1.4.x Gallery, enter the admin mode
- And call the upgrade script, http://yousitename/coppermine_dir/upgrade-1.0-to-1.2.php
- The upgrade from 1.0 to 1.4.x is a two-step process. You must click the link which comes up on the bottom of the page to complete the upgrade!.
- Delete upgrade-1.0-to-1.2.php from your server.
- If you get an error, go to Coppermine 1.4.x config page, enable debug mode, try to call the upgrade script again and check what errors you get.
This upgrade process leaves your v1.0 gallery untouched
3.1.2 Upgrading from cpg1.1.x, cpg1.2.x or cpg1.3.x to version cpg1.4.x
- First, make a backup (dump) of your database.
- Backup your include/config.inc.php file, your anycontent.php file and your "albums" directory.
- Unpack the archive
- Except for the "albums" directory, upload all of the new files and directories making sure not to overwrite the include/config.inc.php file, your anycontent.php file or the albums directory.
- Delete all leftover, outdated language files in the lang folder
- If you have not already done so, create a folder called "edit" within your "albums" directory - this folder will be used by coppermine as a temporary folder, do not ftp-upload files there. Make sure the new "edit"-folder is CHMODed the same way your albums-directory is (755 or 777, depending on your server's config)
- Run the file "update.php" in the coppermine directory once in your browser (e.g. http://yourdomain.tld/coppermine/update.php). This will update your coppermine install by making all necessary changes in the database.
- If you have made a custom theme, apply the changes that were introduced in the themes structure to your custom-made theme - refer to the theme-upgrade guide.
- You can not use language files from older versions of Coppermine as primary language (the language the admin will use) - make sure you only have the language files that come with this package inside of your lang folder (delete or rename all files from older versions within the lang folder).
If you need to use a language that hasn't been translated for cpg1.4.x, you can try using the language file from cpg1.3.x, however there are certain caveats:
- You need to enable the language fallback option in coppermine's config page
- cpg1.4.x-phrases that don't exist in your old language file will go untranslated or show in english
- Coppermine can't be administered using an old language file - the admin needs to use a "true" cpg1.4.x language file
- You're free to try using old language files, however when running into issues or error messages, switch to US-English and see if the issue goes away then. Using outdated language files goes unsupported
- The bridging method has changed from cpg1.3.x to cpg1.4.x. When upgrading, your bridged coppermine install will be unbridged - you will have to re-apply the bridging using the bridge-manager (using your standalone admin account you initially used to set up coppermine). You will not lose anything though, don't worry.
Please note: as there have been changes both in the coppermine files and the database from cpg1.3.0 or better to cpg1.4.x, users of previous versions will have to apply all steps mentioned above: both the files have to be replaced and the update.php script has to be run once.
3.1.3 Upgrading from cpg1.4.0 or better to version cpg1.4.27
- First, make a backup (dump) of your database.
- Backup your include/config.inc.php file, your anycontent.php file and your "albums" directory.
- Unpack the archive
- Except for the "albums" directory, upload all of the new files and directories making sure not to overwrite the include/config.inc.php file, your anycontent.php file or the albums directory.
- Run the file "update.php" in the coppermine directory once in your browser (e.g. http://yourdomain.tld/coppermine/update.php). This will update your coppermine install by making all necessary changes in the database.
- If you have made a custom theme, apply the changes that were introduced in the themes structure to your custom-made theme - refer to the theme-upgrade guide.
Please note: as there have been changes both in the coppermine files and the database from cpg1.4.0 or better to cpg1.4.27, users of older versions than cpg1.4.27 will have to apply all steps mentioned above: both the files have to be replaced and the update.php script has to be run once.
3.2 Why upgrade?
There are major and minor releases of Coppermine. Major releases have so far been cpg1.0, cpg1.1, cpg1.2.x, cpg1.3.x and cpg1.4.x. The next major release will be cpg1.5.x (which currently is in the dev pipeline - no scheduled release date yet). Minor releases (the third number in the version numbering scheme) represent updates, also known as "maintenance releases". Major releases contain new features (compared to the previous major release), minor releases do not contain new features, but only bug fixes and slight improvements (like additional language files).
To understand the release policy of the coppermine dev team you have to understand how bugs are being fixed: we maintain a repository where the core code of each major release is being constantly being improved. Major and minor bugs that are reported on the coppermine support board are being fixed in that repository. Once a new package is being bundled, all fixes that have been made in that repository go into the new maintenance release.
There is a good reason for every new maintenance release: they are usually being packaged when a new bug or vulnerability is being discovered that is relevant in terms of security. As suggested above, there are several minor bugfixes that go into each new release as well, not only the one major bug or vulnerability that lead to the maintenance release. Therefor, it will not be enough to just fix the single vulnerability that has been the initial reason for a new package to be released. Instead, always upgrade to the most recent stable release as soon as it has been announced.
3.2.1 Reasons for package releases
This is a list of minor releases of cpg1.4.x and the reason why they have been released. It is meant to explain why you should upgrade as soon as possible to the most recent stable release if you are running an outdated version.
| Package | Reason for release | Release Date |
|---|---|---|
| cpg1.4.0 |
|
no package |
| cpg1.4.1 |
[more]
|
2005-07-02 |
| cpg1.4.2 |
[more]
|
2005-11-23 |
| cpg1.4.3 |
[more]
|
2005-12-27 |
| cpg1.4.4 |
[more]
|
2006-02-26 |
| cpg1.4.5 |
[more]
|
2006-04-21 |
| cpg1.4.6 |
[more]
|
2006-05-19 |
| cpg1.4.7 |
[more]
|
2006-06-06 |
| cpg1.4.8 |
[more]
|
2006-06-08 |
| cpg1.4.9 |
[more]
|
2006-08-27 |
| cpg1.4.10 |
[more]
|
2006-10-29 |
| cpg1.4.11 |
[more]
|
2007-06-29 |
| cpg1.4.12 |
[more]
|
2007-07-02 |
| cpg1.4.13 |
[more]
|
2007-09-13 |
| cpg1.4.14 |
[more]
|
2007-11-07 |
| cpg1.4.15 |
[more]
|
2008-01-30 |
| cpg1.4.16 |
[more]
|
2008-02-02 |
| cpg1.4.17 |
[more]
|
2008-04-14 |
| cpg1.4.18 |
[more]
|
2008-04-14 |
| cpg1.4.19 |
[more]
|
2008-08-03 |
| cpg1.4.20 |
[more]
|
2009-02-04 |
| cpg1.4.21 |
[more]
|
2009-03-04 |
| cpg1.4.22 |
[more]
|
2009-04-30 |
| cpg1.4.23 |
[more]
|
2009-05-21 |
| cpg1.4.24 |
[more]
|
2009-05-26 |
| cpg1.4.25 |
[more]
|
2009-06-22 |
| cpg1.4.26 |
[more]
|
2010-02-01 |
| cpg1.4.27 |
[more]
|
2010-05-24 |
As you can see, the coppermine dev team is constantly fixing and improving coppermine. Every non-trivial piece of software contains bugs, so there is no guarantee that the version that currently is the most recent one will be the final, ultimately bug-free version to be released in the cpg1.4.x series. It is absolutely vital that you perform regular updates as soon as new packages are being released.
3.2.2 Changelog
Details on the changes that went into a release can be found in the changelog that comes with each package. The changelog file can be found in the root directory of the coppermine package. The changelog contains more information on additional languages and the time and date of the fix as well.
The changelog is a plain-text file that can be read using a simple editor - on Windows-driven machines, notepad.exe is fine.
3.3 The version check tool
Since the release of cpg1.3.2 Coppermine comes with an additional version checking tool to help you resolve issues with upgrades and updates easily. Except for specific files of coppermine that will only work for the version that it had been originally designed for, the versioncheck tool can be used with all versions starting from cpg1.2.1. To launch the versioncheck, simply add versioncheck.php to your browser's address bar after being logged into coppermine as admin (example: http://yourdomain.tld/your_coppermine_folder/versioncheck.php). With version 1.4x, you can run the versioncheck utility from the Admin Tools menu.
3.7.1 What it does
The script "versioncheck" is meant for users who have updated their coppermine install. This script goes through the files on your webserver and tries to determine if the local file versions on your webserver are the identical to the ones at the repository of http://coppermine.sourceforge.net. Files that do not match are displayed and are the files you should update as well. In Cpg1.4.x you can toggle the URL to the latest update for individual files in the versioncheck page.
It will show everything in red that needs to be fixed. Entries in yellow need looking into. Entries in green (or your theme's default font color) are OK and should be left alone. When an entry is red or yellow, a help icon will appear next to it. Click it to find out more. Hovering with your mouse over an item will display additional information as well (tooltip).
The versioncheck screen has several sections:
- Section 1 explains what the versioncheck tool can be used for
- Section 2 ("Options") displays the options you can chose
- Section 3 will display a warning if coppermine was not able to connect to the online repository (where the most recent version data is being stored). The script will default to a local copy of the repository file. If connection to the online repository was succesfull, there will of course be no error message (no section 3).
- Section 4 will show what version of coppermine you actually use. The versioncheck script draws this piece of information from the file include/init.inc.php - if you haven't replaced your copy of this file with the new version during upgrade, your old (outdated) version will appear in this section.
- Section 5 will show the core of versioncheck's file: the version comparison. The script will loop through all files that are suppossed to exist (based on repository data) and compare them to the files you actually have on your webserver.
- Section 6 will display a summary of the files and folders checked
3.3.2 Options
The options screen lets you configure the versioncheck, or rather what is being displayed. The options aren't saved anywhere, so you will have to adjust them each time you run versioncheck. The default options should be OK for most users - only change them if you have good reasons to do so.

- show optional folders/files
Uncheck this to hide files that are tagged as "optional" (display mandatory files only) - show mandatory files
Uncheck this to hide files that are tagged as "mandatory" (Note disabling both optional and mandatory files will of course result in no files being displayed at all) - show additional information
Toggles whether informaton about the installed coppermine version and the repository connection status are being displayed. Uncheck if your're making screenshots to save space and reduce dimensions. - show file versions
Toggles wether additional version information of a file that belongs to the release version you're using should be displayed. When viewing the source code of a coppermine file, the file version is the number that looks like this: Id: index.htm,v 1.66 2004/08/26 04:42:19 gaugau Exp (in this example the file version is 1.66) - show folders/files with errors only
Toggles display of files that don't have errors. Enable this option if you want to make a screenshot and ask for support on the coppermine forum. - coppermine is installed in the webroot
Experimental: if all your files are being displayed as "non-existant", you probably have installed coppermine in your webroot, or you are using subdomains. Check this option only if you are experiencing problems. This option hasn't been tested thoroughly yet, there's no guarantee it will work on your setup. - try connecting to the online repository
Toggles wether versioncheck should try to connect to the online repository (checked by default). Only uncheck this option if you're sure you can not access the online repository because of your server setup and you want to reduce the time the script needs to execute a bit. - show folder permissions
Toggles the option to show/hide the read/write permissions of a folder. - don't display web svn link / display web svn link to stable branch / display web svn link to devel branch
Toggles wether to show an additional column that contains a link to the web svn. Only recommended if your cpg version is OK (green), but your file version appears to be outdated. You can then connect to the web svn to get a more recent version of your file. Only recommended if you know what you're doing (or you have been told to do so from a supporter from the coppermine support board). - show condensed ouput (for easier screenshots)
When checked, this options reduces the width of the version comparison columns. This will allow you to create screenshots with reduced dimensions and size.
3.3.3 Version comparison
There is a lot of information packed into a small space. Here's an example of a possible output and what the output means:

- The column "icon" shows if the entry is a folder or a file. Clicking on the icon takes you to the page, e.g. clicking on util.php will take you to the "admin tools page" (although not all coppermine files can be opened directly by running them in the browser).
In above example, rows "A" to "E" are folders, rows "F" to "K" are files.
- The column "folder/file" holds the relative path from your coppermine root to the folder/file in question.
If an entry is in your default font color, it exists (in above example, all rows but "G" and "H").
If the entry is in yellow (row "G"), the corresponding folder/file doesn't exist on your webserver, but it is only considered to be optional (e.g. a language file that comes with the coppermine package that you don't want to use can be deleted from the webserver. It will then be shown in yellow, as it's only optional to have it). It's up to you if you need it.
If the entry is in red (row "H"), the folder/file in question doesn't exist on your webserver, but it is mandatory to have it. You should upload the file from your coppermine package to your webserver. Only leave it as-is if you really know what you're doing.
- The column "writable" shows information if the folder in question is writable, and whether this is correct or not. The write permissions for files are not being displayed, as this would slow down the script considerably. Usually, there are icons that show the writable status of your folder (if you have the icon resources on your webspace). Optionally, a plain text message in brackets might be visible (if you don't have the icon resources).
- A white pencil with a green "x" indicates that the folder is not writable and is isn't suppossed to be writable - everything is OK then (row "A")
- A green pencil indicates that the folder is writable and it is suppossed to be writable as well - everything is OK then (row "D"
- A white pencil with a red "x" indicates that the folder is not writable, although it should be (row "C"). You should change write permissions (CHMOD) for this folder and everything within it, usually using your FTP software.
- A red pencil indicates that the folder is writable, but it shouldn't be (row "E"). Unless absolutely necessary, leaving files writable could be a security risk. Where possible, you should change permissions for this folder and everything within it to read/execute only.
- A question mark in a yellow box (help icon) indicates that there is additional information available. Click on the icon to display the pop-up window with this information.
- The column "cpg version" displays what coppermine package your file on your webserver is from, and what version it should be from. The data is being extracted from the header of the file, that's why folders are shown as "n/a" - they have no header information containing their coppermine version (rows "A" to "E").
Files that contain header information are being displayed with your file version and the cpg version of the file in the repository, separated with a slash. It is possible that a file version may differ from the version of your whole package - this doesn't matter as long as both your version and the repository versions match (the are displayed in green) - in above example: rows "F", "J" and "K".
Of course, version numbers from files that don't exist can't be extracted, that's why rows "G" and "H" have a dash as cpg version. If your cpg version is lower than the repository version, your version is being displayed in red: if this is the case, you probably haven't successfully uploaded the proper file of files from the coppermine package to your webserver (replacing files that may have already existed on your webserver) - you should do so now (row "I").
If your local version is being displayed in yellow, you are using a file that belongs to a higher coppermine version than the rest of your files - you probably downloaded a file from the devel branch: remember that using devel files go unsupported, do so on your own risk (if you know what you're doing). If most or all of your files are being displayed in yellow, you probably have upgraded some files, but you forgot to upgrade the file "include/init.inc.php" (that holds the version info for your install). Make sure to upload all files from the package to your server.
The column "file version" holds the individual file's version that get's increased during development of a new coppermine version (each time a developer modifies a certain file, the version number increases by one). As folders can't contain such version numbers, they are again labelled as "n/a" (rows "A" to "E"); the same applies to files that don't exist, that's why their file version is displayed as dash (rows "G" and "H"). Also the file version is irrelevant when comparing files from different coppermine packages, that's why row "I" has a dash as well.
The coloring scheme is similar to the cpg version system: green means "everything is OK", red means "you're using an outdated version" and yellow means "you're using a newer version than you're actually suppossed to.
The difference between the cpg version and the file version columns is indicative of the way you should obtain the file that you need to replace the existing one on your server: a red entry in the cpg version column means the file on your server hasn't been replaced with the file from the coppermine package; a red entry in the file version column (row "J") usually means that there have been updates to a certain file after the release of the package - you should either check if there is a newer package available or get the most recent file from the SVN (enable the web svn link column in the versioncheck options).
- The column "web svn" (off by default) links to the corresponding file in the SVN. You're recommended to use this only if there appears to be a newer version in the svn than your coppermine package has and you know what you're doing.
3.4 Downgrading from cpg1.4.x to an older version
CPG1.4.x incorporates many new features (compared to older versions), so we encourage all users to upgrade. However, there may be some who want to test cpg1.4.x and decide later that they want to go back to an older version. You have to keep in mind that a full upgrade changes the overall layout of coppermine's database that includes converting the encoding to unicode. This process can't be reverted: once you have done the conversion, the only way back is to restore a complete mySQL database dump (of course you have to create this backup before you upgraded in the first place). Creating mySQL dumps (backups) is recommended anyway, so you should do so now.
If you haven't converted your database to unicode (utf-8) encoding, you can downgrade as explained below. To make this absolutely clear: you can only downgrade if you used to have cpg1.3.x before and upgraded this version to cpg1.4.x without converting the database. If you have converted the database or if you have made a fresh install of cpg1.4.x, you can't downgrade at all!
To actually perform the downgrade, replace all cpg1.4.x files on your server with the files from the older version (as if you were doing an upgrade, see above). You then have to undo some changes in the database structure. To do so, run a query like
ALTER TABLE `CPG_users` CHANGE `user_location`  `user_profile1` VARCHAR(255);
ALTER TABLE `CPG_users` CHANGE `user_interests` `user_profile2` VARCHAR(255);
ALTER TABLE `CPG_users` CHANGE `user_website` `user_profile3` VARCHAR(255);
ALTER TABLE `CPG_users` CHANGE `user_occupation` `user_profile4` VARCHAR(255);
using a tool like phpMyAdmin, replacing CPG_ in the query with the prefix you have chosen during coppermine install.
4. Configuration & Administration
4.1 Categories, albums and files
The Coppermine Photo Gallery (CPG) works in the following way:
- Files are stored in albums
- Albums are organised in categories
- Categories can be nested (into subcategories)
If you don't plan to have many albums, you really won't need to use the categories feature. If this applies to you, simply do not create any categories and all your albums will automatically appear on the main page of the script.
There is, however, a special category named "User galleries". This category can't be deleted. If a user belongs to the group "can have a personal gallery" and this is set to YES, he will have the right to create his own albums and his gallery will be a sub-category of "User galleries". This link is not visible to visitors of your site, however, if you do not allow users to upload pics and have their own albums.
The administrator can create albums in any category. Non-administrative users can only create albums in the "User galleries/Their_username".
You can, however rename the "User Galleries". To rename the "User galleries" category and description, simply go to your category control panel and change the name there (e.g. to translate the words "User galleries" into your language).
4.2 Admin mode & User mode
When you are logged in as an administrator, the script provides two modes of operation : Admin mode & User mode. You can switch between Admin & User mode by clicking on the corresponding link in the menu bar at the top of the screen.
When you are in admin mode, you can administer your gallery using the menu bar that appears when in admin mode, as shown below :

When you are in user mode you are still logged in as an admin user, but the admin controls (the admin menu bar etc.) are hidden from the screen to give you a basic preview of what the page would look like for "regular users". However (as you still are logged in as admin), certain permissions and options in user mode will still look the same as if you were in admin mode; you can not use "User Mode" to see what a non-admin user is actually allowed to see. To see what a casual visitor can see and do on your site, simply log out. To see what a registered user can see and do on your site, create a test user account (non-admin) and log in with this particular user (when doing this it is recommended that you use two different browsers, NOT two instances of the same browswer, to view your site so you can stay logged in as admin on one and view what regular users see while making changes in admin mode. You will have to refresh the non-admin mode screen to see what changes you incorporated).
The items in the admin menu should be pretty self-explanatory:
- Upload approval
See all pics that await approval by the admin (if you set admin approval as a required step on the settings in the "groups" control panel) - Config
Configure the overall look of your gallery and the settings using the "Config" button in the admin menu (note: you can not access the configuration by manually entering the url of the config file) - Categories
Create/edit/delete categories - Albums
Create/edit/delete albums - Groups
Create/edit/delete groups - Users
Create/edit/delete users - Ban Users
Ban users based on hostname or IP address. Make sure not to ban yourself! Use this feature with extreme caution, as most users today do not have static IP addresses, this feature should only be employed if you really know what you're doing.
[cpg1.3.0 or better required] - Review Comments
edit/delete user's comments - Display Ecards
View the ecards sent by users.
You must have ecard-logging enabled in the config menu, first (by default, logging is disabled). When enabled, all ecards that are being sent are written into the database, where the coppermine admin can view them.
You can sort the log by clicking on the arrow icons next to each heading, and you can delete single or multiple log entries (deleting the log entries will not disable the ecard recipient to view the ecard).
Before switching this option on, make sure that logging such information is legal in your country. It is also advisable to notify your users that all ecards are being logged (preferrably on the registration screen).
[cpg1.3.0 or better required]- Sort my pictures
Picture manager that can be used to custom-sort files within an album. By default, the thumbnail page that displays the contents of an album will be sorted by the sorting order specified in "Default sort order for files" on the config page. The "sort my pictures" option overrides the default sorting mechanism and displays the thumbnails in the order you specify. As this means an additional effort in the maintenance of each album, it's recommended to use the default sorting by filename and (instead of specifying a custom sort order) and naming the files appropriately before upload.
Note: each user (including the admin) can use the sorting controls on the album's thumbnails display page to manually override the sorting option that was specified in coppermine's config and the "Sort my pictures" option; this final method of changing the sort order is stored locally in a cookie of the client and reverts to the config settings when this cookie is discarded.
- Batch add files
Batch-add files to the coppermine database that have been previously uploaded by FTP. Batch-add files does not upload files for you. You must upload files using your webhost's file manager or an FTP client software. You FTP files into folders that you create in the coppermine album directory. You must not, however, create these folders in the userpics folder. - Admin Tools (Resize Pictures)
A collection of utilities to:
- Rebuild or resize intermediate pictures and thumbnails.
Use this if you have changed the settings for thumbnail or intermediate images in config, or if you have to replace corrupt versions.
Select the radio button for this action, then choose to rebuild the thumbnails, intermediates, or both.
This uses a lot of server resources, so if you experience timeout issues, try setting it to process smaller batches ( 45 is the current default ).
- Delete full-size pictures.
Use this to save space on your webspace.
When selected, Coppermine checks to see if an intermediate copy exists, and if it does, it deletes the original sized picture, then re-names the intermediate. If no intermediate exists, Coppermine leaves the original in place.
- Delete orphaned comments.
- Sometimes, when pictures have been deleted, any comments associated with them remain in the database. Use this to remove them from the database entirely.
- Rename file titles.
- Use this to re-name the title of all files in an album, using info from the filename.
- Delete file titles.
- Use this to clear the file titles from one or more albums.
- View your server php info.
If, you after following the troubleshooting guides in the documents provided here, you are still having problems with your coppermine installation, these problems are sometimes caused by a misconfigured server setup. Clicking this link will provide you with all your php and mySQL settings, as well as information on the GD library (if installed). The information may be required by the support team, if you are unable to sort problems yourself.
It is not possible for visitors to your site to access this information, so if asked for it, copy and paste it on the support board. Do not post this information or any debug information unless requested first. You may post ERROR messages verbatim, but refrain from posting warning messages.
- Run a database update (update.php).
- After an update/upgrade, it is usually necessary to run update.php. This can be done by typing the address directly into your browser, or by clicking this link.
- My profile
Edit your own user profile
In previous beta versions of cpg1.4.x there used to be an admin mode and user mode for "regular registered" users, somewhat like those for the true administrator. This feature has been removed as it was both confusing for end users and really didn't serve any special purpose.
The user with upload permissions has the following admin options:
- Create / order my albums
similar to album manager in admin mode, the user can create albums within his user gallery - Modify my albums
The user can edit album title and description (similar to "album properties" for the admin, but the user can't move his albums to other categories) - My profile
The user can edit his profile (changing passwords, edit location, interests, home page and occupation properties, view quota usage). When integrated with a bbs service, the "My profile" link will send the user to the bbs's profile page.
4.3 The group control panel
This is where you define what members of a user group can and can't do.
The disk quota applies only for groups where "Personal gallery" has been set to "Allowed". Both files uploaded by a user in his personal gallery as well as files uploaded to public galleries are included in the quota. Set the quota to 0 to disable the quota (unlimited space).
Use the anonymous group to define what non-registered users can and can't do. Quota and "Personal gallery" are meaningless for anonymous users.
Permissions control what the user is allowed to do in the gallery (Rating/Sending Ecards/Posting Comments).
Bear in mind that if a user is a member of a group where "Rating", "Comments" or "Public albums upload" is set "YES", s/he will have the right to perform these operations only in albums where they are allowed. ( ie. uploading files will only be possible in albums where "Visitors can upload files" has been set to YES.)
If "Personal gallery" is set to Allowed, the members of the group will be able to have their own gallery in the "User galleries" category where they will be able to create their own albums.
If "Approval" is set to NO, files uploaded by members of the group in albums created in their own gallery won't need to be approved by the admin. If "Approval" is set to YES, the users in the particular group will be able to upload, however the uploaded files will only be shown after the admin (you) has approved them.
The group control panel enables you to control the upload parameters of any group.
Upload method lets you select the type of upload method that a particular group may use. Four forms or methods are currently available.
- Single file uploads only - Users of this group may not use advanced uploading features. They may upload one file at a time. To enable single file uploads only, set File upload boxes to "1", URI upload boxes to "0" and No. of boxes to "fixed"
- Multiple file uploads only - Users of this group may upload multiple files at one time. To enable multiple file uploads, set File upload boxes to any number higher than "1", URI upload boxes to "0" - it's up to you to let users configure the No. of boxes, but it's recommended to set it to "fixed" to avoid confusion and to limit the load on your server should several users try to upload simultaneously. You can set the number of file upload boxes to any number from 0 to 10 (5 is the default).
- URI uploads only - The group may only upload files using URIs. Acceptable URIs must begin with 'http://' or 'ftp://'. To enable URI uploads only, set File upload boxes to "0", URI upload boxes to "1" or higher.
- File-URI - Users of this group may upload files using file upload boxes and URIs. To enable both file and URI uploads, set File upload boxes to "1" or higher, URI upload boxes to "1" or higher
No. of boxes set to "variable" allows the user to select the number of upload boxes for an upload. Usually, you will leave this option set to "fixed", as it presents the user with an additional step in the upload wizard that is not necessary.
File upload boxes controls the number of file upload boxes presented to the user. If the user may customize the number of boxes (No. of boxes set to "variable"), this setting serves a maximum limit for the number of boxes he may request. Otherwise, this setting determines the number of boxes that will appear on the upload form.
URI upload boxes is the same type of control as File upload boxes, but it controls the presentation of URI upload boxes.
Please note: on unbridged installs (or standard, stand-alone coppermine installs), the group "banned" feature really doesn't accomplish much. A user who is member of this group is still able to log in and view pics, he's just not able to upload, rate, send ecards or post comments. If you truly want to place a full ban on someone you should use the "banning" feature (which isn't group-based but individually based), instead.
4.4 The user control panel
The user control panel can be found when clicking "users" from the admin menu. It is the place where you create and manage your users.
If you have enabled integration (bridging) Coppermine with another application (e.g. your favorite BBS app), Coppermine will use the member table of the application you bridged with (your BBS), so the built-in Coppermine user management will be disabled in favor of the user management that comes with the bridged application. This has been incorporated to eliminate redundancy and facilitate a seemless integration.
As a result, you will not have this user control panel; clicking the "users" link will send you to your bridge application's user management instead.

4.4.1 Page controls
- You can sort the user management display by either clicking the arrow icons (

 ) next to each column header or by choosing the sort order from the dropdown at the top right.
 - If you have more than 25 users, a page tab will apear at the bottom right of the screen, allowing you to go to subsequent pages of your member list
- Clicking on a user's name will display the profile page of the individual user (read only)
- The edit icon (
 ) will send you to the user's profile in edit mode - you can change the password, email account and other user-related settings there
 - If a user has uploaded any files, a link of "recent uploads" will show up next to his name. Clicking on this link will display files that have been uploaded by that user
- The "group" column displays the primary member group the user is in
- The column "Registered on" will show the date that the user account was created
- The "Last visit" column will show the last login of the user.
Note: if the user has ticked the checkbox "Remember me" on the login screen, he will not have to login every time he visits the gallery so this date may be accurate. - The "Files" column displays how many files the user has uploaded to date (including those that are awaiting admin approval)
- The "Space used" column shows how much of the space that is assigned to the user has already been used. The total space the user is allowed to have ("Space Quota") depends on the user's group - which you set in the groups panel.
- You can change a number of settings for several users at once by clicking the checkbox in front of the user row (use the checkbox at the very top or bottom of the page to select/unselect all users on the page) and then chosing an action to perform from the dropdown box "With selected" at the bottom left of the page. The actions you can choose from are "Delete", "Deactivate", "Activate", "Reset password", "Change primary membergroup" and "Add secondary membergroup". The user currently logged on (you as gallery admin) has no checkbox to avoid accidental deletion or deactivation of your own admin account.
4.4.2 Searching for user(s)
You can use the wildcards: * (for any string) and ? (any single character) or even %expression%.
Example: searching for j* will return both Jack and Jill
4.4.3 Creating new users
To create a new user, simply click on the button "Create new user" at the bottom of the user manager and fill in the form that will come up.
This does of course not apply if you have bridging enabled, as user management is being handled by the app you have bridged coppermine with. In this case, the user management screen of your bridged app should show - create a new user there.
4.4.4 Editing users
 To edit the properties of a user, click the
 ![]() -button next to the user name. You will then find a page where you can modify all user profile fields the user has. This includes the option to change the password of that user. If you don't want to change a user's password, leave the password field blank.
-button next to the user name. You will then find a page where you can modify all user profile fields the user has. This includes the option to change the password of that user. If you don't want to change a user's password, leave the password field blank.
The dropdown list determines the primary group the user is in, the checkboxes beneath it determine the secondary groups.
Please note that this screen (as well as the rest of Coppermine's user management) will not be available if you have enabled bridging, because then the user management of the application you have bridged with (e.g. your BBS) kicks in and handles everything related to user management.
The button "Album permissions by group" can not be used to set permissions, but only to view them. You can set permissions using the album properties screen.
4.4.5 Group membership
When creating a new user or editing an existing user, you will notice a row named "User group" - it determines what group(s) the user is in.
The first field (a dropdown field) determines the primary user group. It determines the status of a user. You should set it to "Administrator" (for users you want to assign admins powers to) or "Registered".
Additional (secondary) group membership can be assigned using the checkboxes beneath the dropdown field. Here, all your custom groups (that you can create and manage using the group control panel) should show as well as the core groups (the ones that come with coppermine out of the box and can't be deleted). Assign additional group membership to your users here. Privileges for a particular user inherited from group membership are added: the least restrictive permissions are taken into account.
Example: if you want your registered users to be capable of viewing the gallery only, and only privileged users of your custom user group "photographers" are allowed to actually upload files, make all your users members of the built-in group "registered" (by default, they already are). Only for user you want to give the privilege to upload, tick the check box "photographers" as secondary group. Then go to your groups control panel and disallow uploads for the registered group there, but allow uploads for the custom group "photographers".
Note: the button "album permission by group" beneath the checkboxes is not meant to assign album permissions, but only to check the permissions set. You can only assign particular album permissions on the album properties screen.
4.5 The categories control panel
This panel allows you to edit your categories.
- The button allows you to edit the title, description and parent category of an existing cetegory.
- The
 button allows you to delete a category. Deleting a category does not delete the albums and files it contains. These are moved to the "Root" category if it is a subcategory that is deleted or to the root of the category list if it is a parent category that is deleted..
 - The
 and
and  buttons allow you to order your categories.
 - The "Move into" dropdown lists allow you to change the parent of a specific category.
"User galleries" is a special category. It is not visible unless you have some users that have created their own gallery. It can't be deleted but you can edit its title and description by using the ![]() button.
button.
You can specify how you want categories sorted in coppermine: alphabetically (instead of a customized order) by setting "Sort categories alphabetically" to "Yes". This setting is available both in coppermine config and the category manager. If you enable alphabetical sorting, the move up and move down arrows that normally let you manually sort the categories will disappear. Disable this feature if you want to organize your categories in some other order.
You can only assign a picture to the category only if you have an album with images nested directly within it.
4.6 The Album Manager

Coppermine stores files inside of albums, so you'll need at least one album for your pictures/files to be placed in. Albums can be stored in categories (but they don't HAVE to be in a category, they can just as well go into the coppermine "root").
When you click on "albums" in the admin menu, you will see the Album Manager.
4.6.1 Creating albums
- Choose a category from the dropdown list "Select category" and highlight the selection where you would like your album to reside in. (or choose "* No category *" if the album should go into the coppermine "root"). If you haven't created a category yet, go to the categories control panel first. Or, you can proceed with these steps to first create an album and move the album into a category later. You can also perform this moving task by using the album properties page.
- To create an album, click on the "New" button - a new album will appear on the list, by default this album is labelled "New album"
- Click on the text input field at the bottom of the screen, highlight the default name "New album"
- Then type in the album name you want to use
- (repeat steps 2 through 4 to add additional albums)
- Click "Apply modifications" to submit your changes to the database. failure to do so will result in the loss of all the changes you just made. You can always return to this panel to edit and change album names, sort them within their parent category, and/or move them to different parent categories.
- After clicking to Apply Modification, confirm your intent in the alert box with &the quot;OK" (Are you sure you want to make these modifications ? button.)
4.6.2 Renaming albums
- Choose a category from the dropdown list
- Click on the album you want to change
- Click on the text input filed at the bottom of the screen, highlighting the album name
- Type the album name you want to assign
- Click "Apply modifications"
- After clicking to Apply Modification, confirm your intent in the alert box with &the quot;OK" (Are you sure you want to make these modifications ? button.)
4.6.3 Changing the album order
- Choose a category from the dropdown list
- Click on the album you want to move up or down in the list
- Use the arrow buttons to move the album up
 or down
- Click "Apply modifications"
- After clicking to Apply Modification, confirm your intent in the alert box with &the quot;OK" (Are you sure you want to make these modifications ? button.)
4.3.4 Deleting albums
- Choose a category from the dropdown list
- Click on the album you want to delete
- Click the "Delete" button
- Confirm the alert box with "OK" (Are you sure you want to delete this album ? All files and comments it contains will be lost !)
- Click "Apply modifications"
- After clicking to Apply Modification, confirm your intent in the alert box with &the quot;OK" (Are you sure you want to make these modifications ? button.)
4.7 Modifying albums/files
When you are in admin mode there is a menu displayed next to each album
Delete allows you to delete the album and (CAUTION) all files within it.
Properties allows you to modify the name, description and permissions of the album
Edit files allows you to modify the title/caption/keywords etc... of the files in the album
4.8 Album properties
The "Album category" drop down list allows you to move an album from one category to another. If you set this to "* No category *" then the album will be displayed on your main page.
Use bbcode to add links and additional formatting to your descriptions.
The thumbnail option lets you select the picture that will represent the album in the album list. Do not assign a picture here if you would like the album to select images randomly.
If you have set "Users can can have private albums" to YES on the config page, you can determine who will have permission to view the files of this album.
When "visitors can upload file" is set to YES, it is possible for them to upload files into albums by enabling this permission.
Note that only visitors who are members of a group for which the setting "Can upload pictures" is set to YES. Members not in the permitted group will not be able to upload files into such an album. Non-registered users are members of the "Anonymous" group.
The same rules as above apply for "Visitors can post comments" and "Visitors can rate files".
In 1.4.x the Album Keyword is no longer being used for searching purposes, but, rather, to link images from other album into another. Using this method, files/images can be displayed in various albums while the file itself need only exists in one album on your webserver. You simply upload a file to one album as you would normally do, then assign one or more keywords to the file. The keyword function reads blank spaces between words as a 'break' and assumes that these words are separate words. If you must use phrases for your keywords, connect them with an underscore or by using the ascii space holder ctrl+Alt+0160 (NOTE: the latter option only works with latin based character sets.) Each album can only have ONE (1) keyword or keyword phrase. All pictures residing in different albums that you would like to be displayed in this album must have the same keyword or keyword phrase in their respective keyword fields. Pictures, unlike albums can have multiple keywords or keyword phrases separated by spaces. This provides you with the option to display pictures in many albums. For the visitor of these albums, it will appear as if the file/image had been uploaded to each.
Album Password: you can specify an album to be password-protected (instead of relying on the "regular" group-based permissions). This way, you can even allow access for unlogged users (guests) who you provide the password to. Use this option, for example, to set up an album for your family members only by specifying a password that only they can come up with answering an additional password hint (e.g. "What was the maiden name of aunt Emma?"), or you could decide to send the particular password to specific friends, family or business associates by email. The optional password hint will be displayed at the password prompt, when set.
Note: when setting an album password, the permission dropdown field "Album can be viewed by" will be switched automatically to "me only" - this is expected behaviour. If you change the "Album can be viewed by" to another selection, you must disable the album password as well.
4.8.1 Reset album properties
You can reset the number of views count and total ratings in the album properties panel and even delete all pics at once in the sub-section "Reset album" by ticking the desired checkboxes and then submitting the form. To prevent accidental resets, you will have to place a tick on the checkbox "I'm sure" before changes can be submitted (the button will be greyed out (disabled) if you don't).
Use these options with care: the deleting of files is irreversible, as well as the reset of views and ratings (you can only restore views and ratings by manually editing coppermine's database entries with third-party tools like phpMyAdmin - not recommended).
4.9 Editing files
Use this link to modify your file's title, description, keywords, and custom fields (if they are used).
Use the album drop down menu in the panel to move the file between albums. Use keywords to link files to other albums (see description in the albums section above).
4.9.1 Editing videos
Here, you can modify the title, description, keywords, and custom fields (if they are used) of your video files.
Use the album drop down menu to move the video to another album.
Use the height and width fields to set the size of the video.
Video uploads are possible beginning with cpg1.3.0 (or latter) and are included as part of the distribution package. For cpg1.2.1 you must install a separate modification.
[cpg1.3.0 or better required]
4.9.2 Custom Thumbnails
Order of thumbnails:
Thumbnails are defined by different levels (these are: user-defined, theme-defined, global) then in the order of their type (file-specific, extension-specific, media-specific). User-defined thumbnails are stored in the folder where the parent file is located. Theme-defined thumbnails are stored in the themes 'images' folder. Global thumbnails are stored within the 'images' folder of the Coppermine root. Thumbnails can be one of the following file types: 'gif', 'png', or 'jpg'.
Types of thumbnails:
File-specific thumbnails must have the same base name as the file. Using the above screenshot of a video file as an example, the thumbnails for this file could be 'thumb_thailand_waterfall.gif', 'thumb_thailand_waterfall.png', or 'thumb_thailand_waterfall.jpg', and searched for by cpg in that order.
Extension-specific thumbnails are named after the extension of the file. (Examples: 'thumb_wmv.jpg', 'thumb_wav.jpg'.)
The base name for media-specific thumbnails are 'thumb_movie', 'thumb_document', and 'thumb_audio'. Images use file-specific thumbnails by default.
Uploading:
There are 2 ways to upload custom thumbnails:
1. Have an image already uploaded then upload a video via the upload page. (or vice versa) The video will share the thumbnail of the image.

2. FTP upload both the video and (thumbnail or image) then batch-add. If you FTP upload the thumbnail, the thumbnail will be display in the batch add page instead of the default Coppermine thumbnail. If you upload an image it will look like the above screenshot. However, when the both files are added to the database, the thumbnail of the image will be used by the video.
Final result.
Note: If the first method is used and the image later deleted, the thumbnail will also be deleted and the default Coppermine thumbnails will be displayed, instead.
If a previously uploaded video is to be uploaded again, via FTP, the accompanying thumbnail must also be uploaded, via FTP, to the same folder.
Video uploads are permitted from verstion 1.3.0 of cpg (or better) and are included as part of the distribution package. For cpg1.2.1, this option is only available as a separate modification. The use of custom thumbnails aren't supported in versions prior to 1.3.0. NOTE: Using the above instructions, a custom thumbnail can be applied to any file, not just videos.
FAQS:
- Quote
- Quote
Your users can upload their own thumbnails by using this trick: Create an album. Change the permissions on it so no one can view it except that specific user. Then upload the fullsized images of the thumbnails to this folder. Files outside this album will be able to use the thumbnails of these images. (See above for naming.)
- Quote
[cpg1.3.0 or better required]
4.10 Using bbcode to insert links and special formatting in various description fields
Coppermine understands the following bbCodes (the same bbCodes that are used by phpBB and many other BBS apps) in image and album description
- [b]Bold[/b] => Bold
- [i]Italic[/i] => Italic
[url=http://yoursite.com/]Url Text[/url] => Url Text(* see below)- [email][email protected][/email] =>
- [color=red]some text[/color] => some text
[img]http://coppermine.sf.net/demo/images/red.gif[/img] =>(* see below)
(*) As of cpg1.4.21, the bbcode tags [img] and [url] are no longer processed properly. These two tags can be used to launch an attack against your website called a Cross-Site Request Forgery attack (CSRF definition). In such an attack a user puts a malicious link in an [img] or [url] tag and can gain control of your website. With such a serious vulnerability, the Coppermine dev team removed processing of these tags to address the immediate risk of such an attack. This is not a final solution but a necessary one.
Now the following processing is done (so that users won't be completely confused):
- [url=http://yoursite.com/]Url Text[/url] => Url Text
- [url]http://yoursite.com[/url] => http://yoursite.com
- [img]http://site.com/image.gif[/img] =>

As you can see above, no links are displayed for [url] tags, but you will see the link either as plain text or as a mouse-over/tooltip on the image next to the link text: . For [img] tags, a placeholder image () is shown with the mouse-over/tooltip showing the image link.
We realize that some administrators will want to process [img] and [url] tags correctly. The Coppermine dev team is working on a solution for cpg1.5 and also one that can be applied to cpg1.4. Information can be found on this thread on the Coppermine support forum. For those who want to hack the code themselves, the relevant function is bb_decode() in include/functions.inc.php. Please be very careful to address CSRF attacks and read as much as you can about them before going live on your website with your hacked fix.
4.11 Uploading pics/files
There are several methods to upload files within Coppermine. You (as gallery admin) should use FTP-upload plus batch-add (only the admin can do this). Regular users are supposed to use the "regular" http upload or (if they have Windows XP) the XP Publisher.
4.11.1 Uploading pics by FTP / Batch-Add Pictures
It is recommended that the coppermine admin use ftp to upload multiple pics/files at a time. Use your ftp software to create sub-folders within your_coppermine_directory/albums/, where your ftp uploads can be saved. Though not mandatory, it's always a good idea to have a folder structure within the albums folder that reflects or mirrors your coppermine categories and albums.
Important: do not create folders or ftp upload to the userpics- nor to the edit-folder by ftp: these folders are used by coppermine internally and must not be used for any other purpose! Folder names must not contain dots. We also highly recommend refraining from the use of any other special characters - use only a-z, numbers and - (dashes) or _ (underscores) to fill blank spaces. Make sure to upload in binary or auto-mode.
Once you have uploaded your photos by ftp, click on the "Batch Add Pictures" button. The batch-add is performed in three steps:
- find the directory under which you have uploaded your photos. Select this directory by clicking on it.

- select the photos you wish to upload (by ticking them). New pics are automatically pre-selected, those that already are in your coppermine database are not selected. Next select thee album you wish to insert them into. Click "Insert Selected Pictures" to start the batch-add process.
- CPG will then display the results of the batch-add (allow some time for all results to display).
If the OK, DP, or PB 'signs' does not appear, click on the broken file image to see if any error message was produced by PHP.
Should your browser time out, hit the reload button.
- OK : means that the file was succesfully added
- DP : means that the file is a duplicate and is already in the database
- PB : means that the file could not be added, check your configuration and the permission of directories where the files are located
- NA : means that you haven't selected an album the files should go to, hit 'back' and select an album. If you don't have an album create one first
Giving FTP-access to other users can pose a serious security threat, this is why batch-add is only available for the coppermine gallery admin.
Once files have been added to coppermine's database, make sure that you never rename or delete them via ftp - use coppermine's admin menu options to remove or rename files, instead. Only in this way will these files be removed from both the file system and the database.
4.11.2 Uploading by HTTP
Regular HTTP uploads use the browser's built-in capabilities to upload files to a server. The maximum file size is determined by two basic factors: the speed and amount of data the web-browser can upload before timing out, and the allowed file size determined by server settings. Note that those settings are not determined by coppermine, but the server config (php.ini). Users who are webhosted usually can't edit php.ini, so they will have to live with the settings the webserver admin has set up. Those who actually run their own server and can edit php.ini should take a look at the settings if (large) http uploads fail:
- max_input_time- 60 seconds is the default time limit for uploading files.
This time limit includes the time it takes for the files to upload, so if you exceed this limit, the file will not even parse, and the browser will not get a response. You can workaround this by trying to upload smaller or fewer files, or you can try uploading over broadband. The best solution, of course, is to increase the time limit to something more in line with your needs. - upload_max_filesize - 2MB is the default limit for individual files.
- post_max_size - 8MB is the default limit for post requests.
- memory_limit - 8MB is the default size.
- PHP's LimitRequestBody - 512KB default limit. (mainly an issue on Redhat/Apache systems. Found in /etc/http/conf.d)
In general, upload_max_filesize < post_max_size < memory_limit in order for uploads to function properly. Coppermine may warn you if a file exceeds upload_max_filesize, but it cannot warn you if the total size of all the files exceeds the post limit or the memory limit. - file_uploads - This determines whether or not PHP will allow file uploads. It must be set to 'On'.
- upload_tmp_dir - This specifies the temporary directory where PHP stores uploaded files.
The most common issue caused by this setting is an open_basedir warning. In this situation, your server administrator has restricted the files that PHP can work with to a certain directory. If he does not create and specify a temporary directory within the open_basedir restriction, PHP will attempt to use the OS temporary directory, and it will be rebuffed by the open_basedir restriction. - allow_fopen_url - This controls PHP's ability to read files using URL/URIs. If it is disabled, Coppermine will not be able to upload from URLs.
It should be obvious that the files have to be uploaded somewhere (into some folder) on your webserver - this is the albums folder within the folder you installed coppermine on your server. The HTTP uploads go into subfolders of the "userpics" folder (which resides within the "albums" folder). Obviously, the coppermine upload script needs write permissions to upload the files there. This is why you have to change permissions on the albums folder and everything within it during coppermine install - make it writable for the user the webserver runs under. This is done using the CHMOD command on Unix/Linux based servers. If you experience issues with uploading, make sure that you have set the permissions correctly.
4.11.3 Using Windows XP Web Publishing Wizard with Coppermine
If you are using Windows XP, you can use its built-in web publishing wizard to upload your photos to your gallery.
Once you have properly installed the script on your server, call the xp_publish.php file from your web browser (http://your_site.com/coppermine_dir/xp_publish.php).
The script displays some information on how to do the installation on the client side and how to use the Wizard. Basically you will need to download a small file created by the script that needs to be loaded into your Windows registry.
If you want to allow your users to use the Windows XP Web Publishing Wizard, it's advisable to promote it by showing a link to the file somewhere on your page.
4.11.3.1 XP Web Publishing Wizard: Setup
Before you can use the XP Web Publishing Wizard, it needs to know the address of the your gallery.- Open your browser and type the following into the address box replacing "your_site.com" and "coppermine_dir" with your own Gallery address information : http://your_site.com/coppermine_dir/xp_publish.php
- On "File Download - Security Warning" click "Save" to save the cpg_###.reg file on your Desktop. (The ### represents a 10-digit numerical timestamp.)
- Open Windows Explorer
- Select Desktop from the left panel
- Double click on the file name that you just saved
- On Registry Editor's "Are you sure..." dialog click "Yes"
4.11.3.2 XP Web Publishing Wizard: Uploading pictures
The process of uploading pictures is a matter of following a simple dialog. It takes much longer to describe the process than do it.- Start Windows Explorer and locate the directory with your photographs and select one or more pictures for upload.
- If the Windows Explorer left panel is not titled "Picture Tasks", click on the "X" in the top right corner of the panel to close it and to reveal the Picture Tasks panel.
- Select "Publish xxxx to the Web" from "File and Folder Tasks" on the left panel. "xxxx" could say "this file, these files or this folder" depending on what is highlighted on the right panel.
- On Web Publishing Wizard's Welcome screen click "Next".
- You can change your selection if necessary on the Thumbnail window showing up. Click "Next" when you are ready.
- From the service provider window highlight your Photo Gallery name and click "Next".
- Enter your Coppermine username and password to login to your gallery and click "Next".
- From the "Welcome username" window you have an option of uploading your picture(s) into one of the existing albums or starting a new album. Click "Next" when you are ready.
- Click "Next" in the upload starting confirmation window.
- Select the picture sizes for the uploaded pictures. If you are unsure about acceptable picture sizes, verify with your Gallery administrator. Click "Next" when you are ready.
- You are presented with the last window of the dialog and given a choice of opening the Gallery when the upload is complete.
- Click "Finish" to end the XP Web Publishing Wizard and to enter the Gallery to check the new album contents.
[cpg1.1.1 or better required]
4.11.4 Upload troubleshooting
If you are experiencing issues with coppermine's upload process, temporarily change your coppermine settings as suggested below to get more detailed error messages. This applies to all upload methods, not only HTTP uploads.
- Log in as admin
Go to your coppermine page and log in as admin - Go to the config screen
- Scroll to the bottom of the page
- Expand the "Maintenance settings" section by clicking on it
- Enable debug mode for everyone
(set Enable debug mode to "Yes: Everyone") - Leave display of notices switched off
(notices are only meant for developers. If you have idea what they mean, leave them off.) - Save the new settings by clicking on "Save new configuration"
- Go to the "groups" panel
- Set the upload form configuration for all groups to "Single file uploads only"
- set File upload boxes to "1" (1)
- set URI upload boxes to "0" (2)
- set No. of boxes to "fixed" (3)
- Save your new settings
(click on "Apply Modifications")
Then try to upload (using http uploads, even if you experienced troubles using another upload method) - you should get a more detailed error message that tells you what exactly goes wrong with your uploads. If the error message doesn't mean anything to you, search the support board for the error message you get.
4.11.5 Asking for support on upload issues
When asking for support on the coppermine forum, post a link to your site and a test user account (the test user mustn't be in the admin group!) with upload privileges, with the above mentioned settings in place - this way, supporters can see the error messages as well. Do not post debug_output unless requested. If you want fast results, you should disable admin approval for the group the test user is in, so supporters can tell instantly what is wrong without needing to double-check.
When people have issues with uploading and decide to post their question on the Coppermine support board, they usually are told to read this upload troubleshooting section. Many of them fail to do so properly, which results in frustration both for users as well as supporters. To make this absolutely clear: the above mentioned steps are absolutely mandatory, no matter what skill level you have, no matter what upload method you have troubles with. Failing to do exactly as suggested will result in your request for help being ignored. Yes, this applies to you. We mean it!
4.11.6 Error messages
Below is a list of common error messages and possible reasons / fixes. Before asking for support, make sure to have read the row that deals with the error you get and tried to apply the suggested fix.
| Error message | Possible cause | Suggested fix |
|---|---|---|
| Impossible to move somepic.jpg to albums/userpics/ Warning: move_uploaded_file(/tmp/phpezCYKr) [function.move-uploaded-file]: failed to create stream: Operation not permitted |
PHP's temporary folder is missing or doesn't have the needed permissions | You should contact the admin of your webhost because you usually can't change the location of the website's temporary directory for file uploads, yourself (it is part of PHP configuration) . If the open_basedir restriction is in effect on your site then the temp directory for file uploads should be one that you can access. |
| Impossible to move somepic.jpg to albums/userpics/ |
The coppermine script doesn't have permissions on the filesystem of the server to create the thumbnail or intermediate image within the specified folder | Apply permissions on the albums folder and everything within it as suggested in the section Setting permissions. This error message is the most frequent one, as many users tend to skip reading the permissions section. At least when getting this error message, you should read it thoroughly. |
| Warning: opendir(./albums/edit): failed to open dir: No such file or directory |
|
|
| Warning: Undefined variable: HTTP_POST_VARS in include/init.inc.php on line 43 |
|
Check if your version of PHP fullfills the minimum requirements for Coppermine. If your version is 4.1.0 or better, then this error is probably caused by a misconfiguration of your hosting server, and not a Coppermine issue. If the server isn't yours to configure properly (that is: if you're with a webhost), you can try this workaround (at your own risk): Edit the file "init.inc.php" and look for
$PHP_SELF = isset($_SERVER['REDIRECT_URL']) ? $_SERVER['REDIRECT_URL'] : $_SERVER['SCRIPT_NAME'];
Replace it with
$PHP_SELF = $_SERVER['PHP_SELF'];
|
| Sorry there is no album where you are allowed to upload files |
|
|
| Fatal error: Allowed memory size of XXXXXXX bytes exhausted at (null):0 (tried to allocate XXXX bytes) in /var/www/html/include/picmgmt.inc.php |
This error occurs when using GD and attempting to upload a high resoltuion image. It's not the size of the file that matters here; it's the number of pixels that determine memory use in GD. |
There is (at least in theory) no limit in Coppermine to the file size or dimensions that the script can handle. However, there is at least one limit existing on the webserver: resizing images (to create intermediate images and/or thumbnails) consumes memory and burns CPU cylces. To prevent the server from crashing, the server admin has to restrict the amount of memory that a PHP script is allowed to consume. The error message mentioned above means that the limit imposed by the server admin has been reached, i.e. the image that the script tried to process consumed to much memory.
|
| Exec() has been disabled |
php.ini allows the server administrator to disable certain functions. Usually this is the case if your server is running in safe_mode. | If the server administrator has disabled exec() you will not be able to use Image Magick. You may try to replace exec() with passthru() in the entire core code of coppermine (not recommended) if it has not been disabled as well. Otherwise, you can't use ImageMagick and must use GD. Change Method for resizing images in config accordingly. |
| Not a GD extension |
The file(s) you tried to upload can not be handled using the GD ImageLibrary | The GD library can only handle jpeg, png and gif files, while the ImageMagick library supports additionally bmp, psd and some other (less common) file types. However, those files are not suitable for use on the internet. Details can be found in the Allowed image types section in the config page of the docs. |
| The file 'albums/userpics/10001/somepic.jpg' can't be inserted in the album. Error executing ImageMagick - Return value 127 |
You haven't specified the correct path to ImageMagick, or you don't have ImageMagic at all. | If you're sure that you actually have ImageMagick available on your server, review path to ImageMagick. If the path appears to be correct, make sure that the coppermine script has permissions to read and execute the convert executable within the ImageMagick folder. If you're not sure, switch Method for resizing images from "ImageMagick" to "GD2", then try uploading again. |
| PHP running on your server does not support the GD image library, check with your webhost if ImageMagick is installed. |
Your webserver doesn't come with support for the GD image library. | Make sure that you fullfill the minimum requirements to run Coppermine. If GD is not available on your server, you could use ImageMagick. Ask your webhost if ImageMagick is available on your webserver. |
| No file was uploaded ! If you have really selected a file to upload, check that the server allows file uploads... |
File uploads are disabled in php.ini or there is a permissions issue or there is an issue with your webserver's upload mechansim. |
There may be several reasons for this error message. The file you tried to upload did not "reach" the folder on the webserver where it is supposed to go. Check if there's a problem with HTTP uploads on your server - this feature may have been disabled or improperly configured. In phpinfo(), check that "file_uploads" is ON, "upload_max_filesize" is something like 2M and "upload_tmp_dir" is a valid directory! Make sure to review your file/folder permissions as well. If the server isn't yours to administer, you may have to ask your webhost for support. Here is what you should check:
|
| Destination directory albums/userpics/XXXXX/ is not writable by the script |
permissions on file system level are not correct | Make sure to review your file/folder permissions. If that doesn't help, ask your webhost for support. |
4.12 The gallery configuration page
This is where you will configure the most important parts of your coppermine gallery. Some settings have an impact on the files you upload - changing the ( * ) astericked options after you have alreaded added a large number of files in your gallery can be a difficult undertaking. For this reason, it is important that you spend time with your coppermine setup at the early stages of gallery development to get those settings exactly the way you want them, before actually uploading too many pics or listing the gallery to the general public.
4.12.1 General settings
Gallery name
Enter the name of your gallery in this text field. The name you enter will appear as the title that is displayed in the web browser's title bar and is also displayed in many of the different theme templates.
Gallery description
Enter a short description of your gallery in this text field. This description is also displayed in some of the theme templates just below the name of your gallery.
Gallery administrator email
All emails sent by the gallery will be sent using this email address. This must be a valid email address.
URL of your coppermine gallery folder
This is the URL where a user will be directed to when s/he clicks on the "See more pictures" link in an e-card. This must be the URL to the root of your coppermine installation followed by a forward slash (just the path to your coppermine folder, e.g. http://yourdomain.tld/coppermine/). Do not specify a specific file (such as index.php) or subfolder within the coppermine gallery in this field.
In previous versions of Coppermine, this field was called "Target address for the 'See more pictures' link in e-cards", but as this url is now being used for other functions in coppermine, it has been changed, appropriately.
URL of your home page
This is the URL where a user will be directed when he clicks on the "Home" button in the main menu.
You can use "/" for the root of your domain, "index.php" for your gallery's default starting page, or any other valid URL. By default this is "index.php".
[cpg1.4.0 or better required]
Allow ZIP-download of favorites
When enabled, users of your site may download files that they previously saved into their favorites collection. These files are dowloaded from the user's "My favorites" page and saved onto their computers in a zip-file format. This option requires zlib to be installed on your server (run phpinfo to check if this php library file exists on your server).
[cpg1.3.0 or better required]
Timezone difference relative to GMT
Specify the time zone difference between your local time and the time zone your webserver is in. This value will be used to adjust time stamps in ecards and other places.
[cpg1.4.0 or better required]
Enable encrypted passwords
This option affects changes on user passwords that are stored as plain text in your database (this is the case if you have upgraded from previous versions of coppermine that did not have this feature). It will encrypt all passwords in the database, and all future passwords will be stored encypted as well. This process can not be reversed: once encryption in turned on, it can not be turned off, so use this option only after giving it some serious consideration.
This option increases user security in coppermine, but comes with a drawback inherent to this method: even the admin will not be able to recover a lost password of a user (or his own password). The password can only be reset to another value using the "I forgot my password" option during login.
[cpg1.4.0 or better required]
Enable help-icons
Enables the display of help icons in various sections of the coppermine admin pages. When enabled, make sure you have also uploaded the "docs" folder into your coppermine folder on your webserver.
If you choose to set this to "Yes: everyone", logged in (registered) users will be able to see the help icons in strategic locations as well, e.g. when creating a user gallery.
As the help text is based on the documentation that comes with coppermine, it is available in English only. If the native language of your user(s) is not English, it is advisable to set this option to "Yes: admin only" to avoid confusion among your users.
It is strongly recommended that you do not disable the help icons altogether: even though you feel that you know your way around in your Coppermine install, the help icons might help you with the functinos of a new or unfamiliar option later.
[cpg1.4.0 or better required]
Enable clickable keywords in search
When enabled, a list of all keywords entered in the "Edit files" page will appear at the bottom of the search page, with each keyword being a clickable search link. Enabling this option is recommended only if you have a small number of keywords in use (e.g. less than 100) - it will provide your users with some ideas as to what they could be searching for in your gallery (in addition to the standard full-text search). Please note that enabling this option for a large list of keywords (e.g. thousands of keywords) can slow down the search page considerably and may be confusing for new users and visitors to your site.
[cpg1.4.0 or better required]
Enable plugins
Enable or disable plugins, with a link to the plugin manager. This is a brand-new feature of coppermine. This feature allows advanced copperminers to create plug-ins that can control the way coppermine looks and behaves without modifying the inherent code of the script itself. We anticipate many exciting, user-contributed, plug-ins in the near future. More details can be found in the plugins section of this documentation. Since plugins add on to the core Coppermine system, if you are having problems, try to disable all plugins using this setting to see if a plugin may be at fault. If so, you can then enable all plugins here, then uninstall or install one plugin at a time in the plugin manager to figure out which one is at fault.
[cpg1.4.0 or better required]
Allow banning of non-routable (private) IP addresses
Today, most people on the internet have dynamic IP addresses that are assigned to them when connecting to the internet by their Internet Service Provider. These IP addresses change each time the user connects to the internet, but during an internet session these IP addresses are "visible" at the web-sites that thee user is surfing. Within the range of all IP addresses (0.0.0.0 to 255.255.255.255), certan ranges are reserved for special purposes (mostly for the use on private networks). The banning feature will not accept IP addresses banning of addresses that belong to these private ranges (e.g. 192.168.0.1). This is necessary to prevent unexperienced, as well as experienced, coppermine admins from banning IP addresses within their own LAN. If you're actually running Coppermine on your LAN/WAN that uses private IP addresses (e.g. on a company's intranet) and you want the authority to be able to ban users, switch this option to "Yes". If you're running coppermine on a webserver located in the internet (e.g. you're webhosted), you should keep this option set to "No".
If you don't use banning at all, you can safely ignore this setting completely.
[cpg1.4.0 or better required]
Browsable batch-add interface
When batch-adding files (that you have uploaded using FTP before) to your gallery, you have the option to switch between a browsable list, where you can go scroll through the directory structure in your albums-folder or to display the whole directory structure at once. Enable this option if you have a larger structure of directories and subdirectories you want to browse through (this requires your browser to be capable of displaying iframes). Set this option to "No" (disabled) if you want to use the "classic" coppermine interface that shows a complete list of the structure at once.
Should you have difficulties using one, try the other. You can toggle between these options on the batch-add page as well.
[cpg1.4.0 or better required]
4.12.2 Language & Charset settings
Language
This sets the default language for your gallery.
Coppermine has a separate language file that makes the translation of the script much more easy. The language files are stored in the lang directory. The files are unicode encoded (utf-8). They are automatically generated with the iconv program so there is no need for you to make an unicode version of your translation.
If you select utf-8 to be the default encoding in coppermine's config, then the script will be able to automatically select a language file based on the visitor browser configuration.
Here's how coppermine determines the language of a user: when accessed, coppermine checks if a user explicitely has set a language preference (which is stored in a cookie on the client). If one is set, coppermine is being displayed in that particular language.
If no individual language preference has been set, coppermine detects the language preference of a user set up in his browser. If the browser language is (for example) English, then coppermine will display in English.
If the browser language is set to hindi (as an example), while there is no Coppermine language file available for that particular language, then coppermine will fall back to the default language you have set up in Coppermine's config.
As you can see, the determination of the actual language setting is a three step process:
- user preference (cookie)
- browser setting
- coppermine config setting
This three-step-process is very helpful: in fact, you only set a default language in Coppermine's config (usually the language the majority of your visitors is speaking) and that's it: if a visitor who speaks another language visits your page, Coppermine's controls will display in his language. Usually, you don't have to provide a language selector on your page (but it's an option in Coppermine's config to display one if you prefer so). The language selector in fact just adds a parameter to the URL, which then subsequently triggers a cookie to be set on the client. You (as Coppermine admin) can accomplish the same by manually adding the parameter to the URL in the address bar of your browser. Just observe how the URL changes on the your coppermine gallery if you have enabled the language selector in coppermine's config to get an idea how this works.
When the script auto detects the preferred language, it stores the result in a cookie on the visitor's computer. To reset this cookie (and thus force the script to do another auto detection) the user must call this autodetect function with something like: http://yoursite.com/coppermine_dir/index.php?lang=xxx
Once you have added comments or files to your gallery, you should not change the character set of your gallery. If you do so, non-ASCII characters may display properly.
Fallback to English if translated phrase not found?
Enable this option if you're using languages other than english. If a certain word or phrase doesn't exist within your language file, coppermine will display the equivalent english phrase, instead.
This feature has been introduced to allow the use of previous version language files -- language files that may have not been translated for the this version, yet. Until an updated version of the language file is made available, you can use this option. Most translation differences affect the admin part of coppermine only, so the admin will experience most of these untranslated strings. The admin will see some phrases in english instead of his/her preferred language for strings and words that don't exist in the currently available language file. NOTE: this fallback option only works for 95% of all phrases, there may still be some other translation omissions.
[cpg1.4.0 or better required]
Character encoding
This should normally be set to "Unicode (utf-8)" (or "Default (language file)"). See the discussion in the "language" section of this page.
Display language list
Enable this option if you want your users to be able to select a preferred language from a dropdown list (you can specify to display only the list itself or a label saying "Choose your language:" in front of the list). Edit your template file (/themes/yourtheme/template.html) to specify where the language dropdown list should appear on your gallery (look for the call tag: {LANGUAGE_SELECT_LIST}).
[cpg1.3.0 or better required]
Display language flags
Enable this option if you would like the option of having your users select languages appropriate for their use by merely clicking on a flag icon which representing their language or country (you can specify to display the flags themselves or include a label that states: "Choose your language:" in front of the flags). Edit your template file (/themes/yourtheme/template.html) to specify where the flags should appear in your gallery (look for the call tag:{LANGUAGE_SELECT_FLAGS}).
[cpg1.3.0 or better required]
Display "reset" in the language selection
This option only applies only if you enabled user language selection - it will show a "default"-icon or list entry to let the users go back to the original language of your gallery.
[cpg1.3.0 or better required]
4.12.3 Themes settings
Theme
Use this dropdown list to select the default theme for your gallery (Themes are stored in sub-directories of the themes directory ).
Display theme list
Enable this option if you want your users to be able to select other themes from a dropdown list (you can specify to display only the list itself or a label saying "Choose your theme:" in front of the list). Edit your template file (/themes/yourtheme/template.html) to specify where the theme dropdown list should appear on your gallery (look for {THEME_SELECT_LIST}).
This option only makes sense if you have at least one alternative theme in your /themes/ folder other than your default theme. We recommend using this option only if there's are additional benefits for the user (for example a theme with less graphics in it that loads faster for users on a dial-up connection, or a theme with reduced color pallettes and good contrast).
[cpg1.3.0 or better required]
Display "reset" in theme selection
This option applies only if you enabled the user theme selection option - it will show a "default" list entry to let the users go back to the original theme of your gallery.
[cpg1.3.0 or better required]
Display FAQ
This option adds a "FAQ" link to the menu bar when enabled. If a user clicks on it, it will display a list of "Frequently asked question" on how to use coppermine. To change the content of the FAQ, edit the file /your_coppermine_folder/lang/yourlanguage.php (e.g. english.php) and look for
// ------------------------------------------------------------------------- //
// File faq.php
// ------------------------------------------------------------------------- //
Edit the content that comes after it.
[cpg1.3.0 or better required]
Name of your custom link
Use this if you want to create a custom link that will appear in the menu. What you enter here will be the name of the menu link or button. Leave space blank if you do not have any specific use for it.
[cpg1.4.0 or better required]
URL of your custom link
This is the URL where the user's browser will be directed to when s/he clicks on the "Custom link name" button in the main menu.
You can use any valid URL.
Leave this blank if you do not have any specific use for it.
[cpg1.4.0 or better required]
Display bbcode help
When enabled, this will display the bulletin board codes that may be used in description fields to help with the formatting of text, images and links.
[cpg1.3.0 or better required]
Display the vanity block on themes that are defined as XHTML and CSS compliant
When enabled and using a theme that has been defined as XHTML and CSS compliant, the vanity block will be shown. The vanity block contains the logos and links for HTML and CSS compliance at w3.org, as well as pointers to the PHP, and MySQL projects.
[cpg1.4.2 or better required]
Path to custom header include
Optional relative path to a custom header file. Using this option, you can include non-coppermine code bits to be included into your theme, e.g. an overall navigation that gets included on your whole website. You can only add a relative path (seen from the root path of your coppermine install) - not an absolute one, nor a http include from another website. This option is only meant for experienced users who have some PHP know-how.
Warning: you mustn't include full html pages that contain an html header or footer (tags like <head> or <body>), nor can the included file do file header manipulation, e.g. reading another (non-coppermine) cookie.
[cpg1.4.0 or better required]
Path to custom footer include
Optional relative path to a custom footer file. The same remarks apply as for the custom header include path.
[cpg1.4.0 or better required]
4.12.4 Album list view
Width of the main table (pixels or %)
The number you type in here becomes the default width of the display tables used on your main page or when you are viewing thumbnails of an album. You can enter the width in pixels or specify it in percentages. The default value is 100%.
Number of levels of categories to display
The default value is 2. With this value the script will display the current categories plus one level of sub-categories.
Number of albums to display
This is the number of albums to display on a page. If the current category contains more albums than what is allowed on the page, the album list will be split over multiple pages with tabs at the bottom of each album list table that users can click on to advance to the next set of albums in a particular category.
Number of columns for the album list
Self-explanatory. The default value is 2.
Size of thumbnails in pixels
This sets the maximum size of the thumbnails that are to be displayed for each album. 50 means that the thumbnail will fit inside a square of 50x50 pixels.
If the size you specify there is larger than "Pictures and thumbnails settings/Max width or height of a thumbnail", the thumbnail will be stretched. Aesthetically, it is better to have thumbnails smaller than or equal to the Max width or height settings here.
The content of the main page
This option allows you to change the content of the main page displayed by the script.
The default value is "catlist/alblist/random,2/lastup,2"
You can use the following "codes" to include other items:
- 'breadcrumb': navigation inside the gallery (e.g. "home > category > subcategory > album")
- 'catlist': category list
- 'alblist': album list
- 'random': random files (leaving random files "on" for huge galleries with more than 10,000 pics might result in performance problems; switch random "off" in this case)
- 'lastup': last uploads
- 'topn': most viewed
- 'toprated': top rated
- 'lastcom': last comments
- 'lasthits': last viewed
- 'anycontent': inserts php-generated content that has to reside within the file 'anycontent.php' into the index page. Can be used to include banner-rotation scripts or similar.
- 'lastalb': last created albums
Unless you really know what you are doing you should always keep catlist and alblist in "the content of the main page", as they make up the core parts of the index page or any gallery site, for that matter.
The ,2 dictates that cpg should display 2 rows of thumbnails.
Show first level album thumbnails in categories
Use this setting to choose whether or not to display thumbnails from the first album of the categories listed on the default gallery entry page.
Sort categories alphabetically (instead of custom sort order)
You can dictate that coppermine sort all categories alphabetically (instead of in a custom order) by setting "Sort categories alphabetically" to "Yes". This setting is accessible both in the coppermine config menu and in the category manager. If you enable alphabetical sorting, the up and down arrows that normally let you move categories up and down in the custom sorting list will disappear.
[cpg1.4.0 or better required]
Show number of linked files
If you use album keywords to display images/files in more than one album, enabling this option will display additional information for the album stats: if an album doesn't only contain "regular" files, but files linked via the "album keyword" option as well, the number of linked files will be displayed separately like this "3 files, last one added on Oct 07, 2004, 3 linked files, 6 files total".
[cpg1.4.0 or better required]
4.12.5 Thumbnail view
Number of columns on thumbnail page
Default value is 4 this means that each row will show 4 thumbnails.
Number of rows on thumbnail page
Default value is 3.
Maximum number of tabs to display
When the thumbnails spread over multiple pages, tabs are displayed at the bottom of the page. This value define how many tabs will be displayed.
Display file caption (in addition to title) below the thumbnail
Toggles whether the file caption is displayed below each thumbnail while user is in (regular) thumbnail view.
[cpg1.3.0 or better required]
Display number of views below the thumbnail
Toggles whether the number of views is displayed below each thumbnail while user is in thumbnail view.
[cpg1.3.0 or better required]
Display number of comments below the thumbnail
Toggles the display of the number of comments for below each thumbnail.
[cpg1.3.0 or better required]
Display uploader name below the thumbnail
Toggles the display of the name of non-admin uploaders below each thumbnail.
[cpg1.4.0 or better required]
Display names of admin uploaders below the thumbnail
Toggles the display of admin uploader names below each thumbnail for users that have the administrators group set as thier default group.
[cpg1.4.0 or better required]
Display the file name below the thumbnail
Toggles the display of the file name below each thumbnail.
[cpg1.4.0 or better required]
Default sort order for files
This option determines the default order in which thumbnails should be displayed. Your user can override this by selecting a custom sort order from the sort buttons above the albums.
Minimum number of votes for a file to appear in the 'top-rated' list
Used to determine how many votes a file must receive before appearing as a "top-rated file." If a file has received less than "this value" of votes, it will not be displayed in the "top-rated" page. This value must be greater or equal to 1.
4.12.6 Image view
Width of the table for picture display (pixels or %)
The minimum width of the table that will be used to display the intermediate picture.
Examples:
600 = The table around the pic will be 600 pixels wide (if the pic has larger dimensions this table will expand accordingly to fit the image).
100% = use all available space based on the horizontal dimension of the pic.
File information are visible by default
Define whether or not the file information block that appears below the intermediate image should be visible by default (If turned off, users can still view the info block by clicking on the ( i ) button..
Max length for an image description
Maximum number of characters that an image description may contain.
Show film strip
Toggles display of a "film strip" showing thumbnails of prior and subsequent files in the album.
[cpg1.2.0 or better required]
Display file name under film strip thumbnail
Toggles the display of the file name below each thumbnail in the film strip.
[cpg1.4.0 or better required]
Number of items in film strip
Sets the number of thumbnails to display in film strip. The number you can set here is dependent on your thumbnail size and monitor size. If you do not want to inconvenience users with smaller monitors set this value between 4-6.
[cpg1.2.0 or better required]
Slideshow interval in milliseconds
This sets the time that each pic is to be displayed (transition interval) when a user is viewing a slideshow (the next pic is being loaded/cached while the current one is being displayed). This setting must be in milliseconds (1 second = 1000 milliseconds).
Remember that setting this to a very low value may not be in the best interest for all of your users, especially those who are on dial-up connections, or if you have large files (kb)that may take longer than the allotted time to display.
4.12.7 Comment settings
Filter bad words in comments
Remove "bad words" from comments. The "bad words" list is in the language file. NOTE: Not all language files may contain an equivelent for this list.
Allow smilies in comments
Toggle the use of smilies in comments.
Allow several consecutive comments for a specific pic/file from the same user
This setting toggles flood protection for the comments option. When set to YES, a user can post another comment, even though he already posted a previous one. Some users may abuse this setting. The recommended setting is: NO.
Max number of characters in a word
This is designed to prevent someone from breaking the flow of your gallery layout by posting lengthy comments without using spaces between words. With this default value, "words" that longer than 38 characters are automatically censored.
Max number of lines in a comment
Prevent a comment for containing too many "new line" characters (enter key).
Maximum length of a comment
Maximum number of characters that a comment may contain.
Notify admin of comments by email
Toggle if you want to receive an email each time a comment is being posted. Warning: only enable this option on sites with very low user traffic or you may soon find yourself flooded with notification emails.
Sort order of comments
Changes the sorting order of comments made to a file.
Ascending: latest comment at the bottom, oldest comment at the top
Descending: latest comment at the top, oldest comment at the bottom
Prefix for anonymous comments authors
If you allowed anonymous comments (permissions set on the groups control panel), this prefix will be used for comments left by unregistered users. This can be helpful in preventing and identifing unregistered users posing as other registered users (or even an admininstrators) when leaving comments. Leave this blank if you do not want a prefix for guest's comments.
4.12.8 Picture and thumbnail settings
Quality for JPEG files
The quality used for JPEG compression when the script resizes an image. Values can range from 0 (worst) to 100 (best). By default this value is set to 80. This value can be set to 75 when using ImageMagick.
Do not change this setting unless you really know what you're doing. Other settings for thumbnail and intermediate pic (dimensions) may have a significant and undesireable impact on filesizes and image quality.
Max dimension of a thumbnail
Sets the maximum allowable size in pixels for the specified dimension of your thumbnails.
Use dimension ( width or height or Max aspect for thumbnail )
Sets the dimension (height or width) on which the maximum pixel size limitation should apply to.
Create intermediate pictures
By default, whenever you upload a file, the script creates both a thumbnail of the file (file name using "thumb_" as its prefix) and an intermediate version of the file(file name using "normal_" as its prefix). If you set this option to NO, the intermediate file will not be created.
Max width or height of an intermediate picture
The intermediate pictures are those that appears when you click on a thumbnail. The default value is 400, it means that the intermediate picture will be created to fit inside a square of 400x400 pixels. NOTE: Currently, 33% of your users have monitors set at 800 pixels wide, another 33% have their settings at 1024 pixels, the rest have settings less than or greater than these two numbers. Therefore a setting of 600 or less would fit the screens of most users. Keep in mind,however, that setting this size larger than 400 impacts the file size of your intermediate pictures and the time it takes to download and display on slower connections.
Max size for uploaded files (KB)
Any file with a file size larger than this value will be rejected by the coppermine script. Setting this option to a higher value than what is actually supported by your webserver will only result in "funny" webserver error messages in lieu of "regular" coppermine error messages. Therefore, it is recommended that you set this value to a size that is slightly lower or equal to the max file size that your server is set to handle. The actual size your server can handle cannot be determined by Coppermine (or any PHP script) - when in doubt, contact your webhost.
Prior to an FTP upload of files, it is recommended that the admin use their imaging software to resize (individually or by batch processing) larger files to a more practical size. This will facilitate the FTP process and the creation of intermediate pictures and thumbnails.
Max width or height for uploaded pictures (pixels)
Limits the height and width dimensions of the pictures that are uploaded. Resizing large pictures requires a lot of memory and consumes CPU resources. As a result, there are usually limitations that have been set by your webserver (host) regarding the maximum uploadable file sizes - you cannot set this value to one that is higher than what is actually supported by your webserver. Contact your webhost/server if you are not sure about your site's file size limitations. (Ideally, users will resize their pictures to a more manageable size prior to attempting any uploads. Determine what you would like the maximum size for a full size pic should be (dpi and dimensions, while keeping in mind the screen size of your users) and use that as a recommended standard for FTP and user HTTP uploads. Inform your users of this recommended size constraints.)
Auto resize images that are larger than max width or height
During the upload process, if images are larger than the maximum width or height allowed they will automatically be resized to the maximum allowable size. Users with especially large files should be advised to resize their pictures outside of coppermine before uploading as this process also consumes considerable resources when processed online.
Note: How the image is resized (width/height/max aspect) is set in the admin option "Use dimension (width or height or Max aspect for thumbnail)"
There are three options:
- No - Disabled
- Yes: Everyone - Enabled for all users, including the Admin during batch-add process.
- Yes: User only - Enabled only for regular users
[cpg1.4.0 or better required]
4.12.9 Files and thumbnails advanced settings
Albums can be private
If set to YES then your gallery can contain albums that are visible only to users that belong to a specified group. This is ideal for creating albums that contain files that you want accessible to only a select group of people. You could also create a userID and password and inform specific users/customers of the ID and password needed to view these files.
If a user is a member of a group that can have its own gallery and this option is turned on then this user will have the permission to hide any of his/her albums from other users.
This option does not determine whether users can have personal galleries at all, nor does it determine who is allowed to upload and who is not (these settings are accessible in the groups manager). You should only set this option to NO if you really know what you're doing (by default, it is set to YES).
Note: if you switch from 'yes' to 'no' all currently private albums will become public!
Show private album Icon to unlogged user
Toggles the display of the private album icons to unlogged users.
Set to 'NO', the album is completely hidden from unauthorised users.
Set to 'YES', the album name, description and statistics are shown, but not the thumbnails or files contained within.
Characters forbidden in filenames
When the filename of a file that is uploaded contains any one or more of these characters, the characters will be replaced with an underscore.
Don't change this unless you know exactly what you are doing.
Allowed image types
"ALL" will result in all allowed image file types that your image library (GD or ImageMagick) is capable of handling to be allowed as uploads and content in your gallery. If you want to restrict the allowed file types to certain types only, enter a slash-separated list of extensions, e.g. jpg/bmp/tif
[cpg1.3.0 or better required]
Allowed movie types
"ALL" will result in all allowed movie file types to be uploaded. If you want to restrict the allowable file types to certain extensions only, enter a slash-separated list of extensions, e.g. wmv/avi/mov.
Note that being able to display a movie requires that the cpg-user have the necessary codecs properly configured on their computers to display the movie file, e.g. if you allow the file type mov, the user who wishes to view the file will need to have Apple's Quick-Time plug-in installed. Also note that avi is just a container for different codecs - this means that a computer which is capable of playing movie1.avi may not be capable of playing movie2.avi if those files have been encoded with different 'avi' codecs.
[cpg1.3.0 or better required]
Movie Playback Autostart
If set to YES, movies will instantly start playing when loaded (has no affect on flash files, however). Nothing will happen if the user does not have the necessary codecs installed on their computer.
Allowed audio types
"ALL" will result in all allowable audio file types to be uploaded. If you want to restrict the allowed file types to certain extensions only, enter a slash-separated list of extensions, e.g. wav/mp3/wma.
Note that being able to listen to an audio file requires that the cpg-user have the necessary codecs properly configured on their computers to hear these files, e.g. if you allow the file type mp3, users who wish to listen to the file will need to have a media player installed on their computer that can handle mp3 files.
Warning: if your webserver is not hardened against an exploit of a vulnerability in the apache webserver setup, then it might be a security risk to allow the upload of ram, ra and rm-files. If you're not sure, do not allow this file types.
[cpg1.3.0 or better required]
Allowed document types
"ALL" will result in all allowable document file types to be uploaded. If you want to restrict the allowable file types to certain extensions only, enter a slash-separated list of extensions, e.g. txt/pdf.
Note that being able to browse a document file requires the cpg-user to have a compatible software installed and configured properly on their computer that is capable of displaying the type of document in question, e.g. if you allow the file type xls, users who wish to browse the file will need to have an application installed on their computer that can display MS-Excel sheets. Be extremely careful with document that are known to be vulnerable to virus contamination, embedded or as macros. This is especially true if you plan to allow users the capability of uploading documents without admin approval.
Warning: if your webserver is not hardened against an exploit of a vulnerability in the apache webserver setup, then it might be a security risk to allow the upload of rar-files. If you're not sure, do not allow this file type.
[cpg1.3.0 or better required]
Method for resizing images
Set this to the type of image library you have on your server (must be either GD1, GD2 or ImageMagick). GD2 is the recommended setting.
If you are using GD 1.x and the colors of your thumbnails or intermediate image do not display properly, then, chances are, you actually have GD2 on your server - switch this option to GD 2.x
More recent distributions of PHP come pre-packaged with GD - if you're not sure what you have, set this option to GD2. You can also look at your PHP settings by pointing your browser to the phpinfo.php file in your gallery. eg, http://www.yourgallery.com/your_cpg_folder/phpinfo.php. For more information on using PHP click on this link: phpinfo.
Path to ImageMagick 'convert' utility (example /usr/bin/X11/)
If you intend using ImageMagick convert utility to resize you picture, you must enter the name of the directory where the convert program is located in this line. Don't forget the trailing "/" to close the path. This path must only indicate the directory where the convert utility is located, it should not point directly to the convert utility.
If your server is running under Windows, use / and not \ to separate components of the path (eg. use C:/ImageMagick/ and not C:\ImageMagick\). This path must not contain any spaces under Windows so that it will not put ImageMagick in the "Program files" directory.
ImageMagick will not work properly if PHP on your server is running in SAFE mode and it is a real challenge to get it running under Windows. Please consider using GD in these cases and don't waste your time asking for support in the forum with ImageMagick installation questions. There are just too many things that can prevent ImageMagick from work properly and without physical access to your server it is extremely difficult to guess what is wrong.
Allowed image types (only valid for ImageMagick)
This is the list of image types that the script will accept when using ImageMagick. Image type detection is performed by reading the header of the file and not by looking at its file extension.
Command line options for ImageMagick
Here you can add options that will be appended to the command line when executing ImageMagick. Read the ImageMagick Convert manual to see what is available.
Read EXIF data in JPEG files
With this option turned on, the script will read the EXIF data stored by digicams in JPEG files. For cpg1.x to cpg1.2.1, this option will work only if PHP was compiled with the EXIF extension. Coppermine 1.3.0 (or better) comes with built-in EXIF support even if the webserver itself doesn't have EXIF support, as it uses a separate EXIF class.
[cpg1.3.0 or better required]
Read IPTC data in JPEG files
With this option turned on, the script will read the IPTC data stored by digicams in picture files.
[cpg1.3.0 or better required]
The album directory
This is the base directory for your "Image Store". The path is relative to the main directory of the script.
You can use ../ in the path to move-up one level in the directory tree.
You can not use an absolute path there ("/var/my_images/" will not work) and the album directory must be visible by your web server.
This setting mustn't be changed if you already have files in your database. If you do so, all references to your existing files will break.
The directory for user files
This is the directory where files uploaded using the web interface (URL/URI) are stored. This directory is a subdirectory of the album directory. It's recommended that you leave this setting as is. Should you decide to change it, keep in mind that the folder must exist within the albums folder and the path should be relative to it.
The same remarks as above apply.
When you upload files by FTP, store them in a subdirectory (folder) of the "album directory" and not inside the "directory for user files".
This setting mustn't be changed if you already have files in your database. If you do, all reference to previously existing files will no longer be valid.
The prefix for intermediate pictures
This prefix is added to the file name of created pictures.
These setting mustn't be changed if you already have files in your database. If you do, all reference to your existing files will become invalid.
The prefix for thumbnails
This prefix is added to the file name of created intermediate thumbnails.
These setting mustn't be changed if you already have files in your database. If you do, all reference to your existing files will become invalid.
Default mode for directories
If, and only if, during the file upload or batch add process, the installer complains about the directory not having the right permissions, try setting this to 0777 . Failure to do so may prevent you from being able to delete directories created by the script with your FTP client should you ever decide it necessary to uninstall the coppermine script.
Note: setting this option doesn't CHMOD the files or folders that are being uploaded. Instead, the setting is used when coppermine, itself, creates new folders for user uploads (within the userpics directory). If you experienced problems during the initial Coppermine setup related to permissions, this option is not what you have been looking for nor should it be changed ( for more information regarding CHMOD, see the FAQ.htm document located in the DOCS folder of this installation package ).
Default mode for files
If, and only if, during the file upload or batch add process, the installer complains about the directory not having the right permissions, try setting this to 0666.
Note: setting this option doesn't CHMOD the files or folders that are being uploaded. Instead, the setting is used when coppermine, itself, creates new folders for user uploads (within the userpics directory). If you experienced problems during the initial Coppermine setup related to permissions, this option is not what you have been looking for nor should it be changed ( for more information regarding CHMOD, see the FAQ.htm document located in the DOCS folder of this installation package ).
4.12.10 User settings
Allow new user registrations
Defines whether new users can self-register or not. If you set this to NO, only the admin can create new users and the "register" link won't be displayed in the navigation.
Allow unlogged users (guest or anonymous) access
When set to "No", unlogged users (i.e. guests or anonymous users) can not access anything in your gallery except the login screen (and the registration screen, if you allow registrations). Completely disabling anonymous access will probably decrease your site's popularity. Use this option only if you need your gallery to be absolutely private. The recommended setting is to leave anonymous access enabled and use the more specific permissions by groups and albums settings instead.
[cpg1.4.0 or better required]
User registration requires email verification
If set to YES an email will be sent to the user that will contain a code to activate his account. If set to NO, user accounts become immediately active.
Notify admin of user registration by email
If set to YES an email will be sent to the gallery admin when a new user registers.
[cpg1.3.0 or better required]
Admin Activation
Enable admin activation. When set to yes, a gallery administrator must first activate the new registration before the user can log-in and take advantage of any registered user privileges.
By default, it is set to no, so users would activate their own accounts upon registering.
[cpg1.4.0 or better required]
Allow two users to have the same email address
Allow or prevent two users from registering with the same email address. Recommended setting is NO. As most internet users today have more than one email address, this option is being considered as deprecated and will possibly be removed in future versions of coppermine.
Notify admin of user upload awaiting approval
When enabled, the gallery admin receives an email notification of all pics that await for his/her approval (depends on the approval settings in "groups"). The email is sent to the address specified in "General settings".
This option is only recommended for websites with low or medium traffic (where users only upload every now and then).
[cpg1.3.0 or better required]
Allow logged in users to view memberlist
When enabled, an additional menu item "Memberlist" is displayed in the coppermine main menu if a user is logged in, to let him see a list of all users, with stats on their last visits, uploads and quota usage.
This is a new feature since cpg1.3.0 (user contribution by Jason) - it's available as mod (not in the regular coppermine package) for older versions than cpg1.3.0.
[cpg1.3.0 or better required]
Allow users to change their email address in profile
This option impacts the user's profile page, it determines whether or not the user can change his/her own email address.
Use this option wisely, as the old email address of a user is not preserved after a change: if you allow users to change their email address, abusers may change it to a non-existing email address (e.g. after uploading some pics that go against your gallery's rules) - you would have no chance of tracking this user.
This option only applies if you use Coppermine as a standalone application; if you run Coppermine integrated with a bbs, this option will be deferred to the user profile from your bbs to manage each user's profile.
[cpg1.4.0 or better required]
Allow users to retain control over their pics in public galleries
When enabled, both the admin and the uploading user can edit and delete files that were uploaded to a public gallery. Of course the user must have permissions to upload to the public gallery in the first place (see the groups control panel) before this option will have any effect.
[cpg1.4.0 or better required]
Number of failed login attempts until temporary ban (to avoid brute force attacks)
To make brute force attacks (where a hostile script tries to log into coppermine as admin by running through all possible combinations of username and password automatically) less effective Coppermine temporarily bans the IP address of a possible attacker after a certain amount of failed logins. This way, the brute force attack would need way too long to try all possible combinations.
With this setting you specify the maximum number of failed log-in attempts before the IP address of the user is temporarily banned.
[cpg1.4.0 or better required]
Duration of a temporary ban after failed logins
This value specifies the duration of the temporary ban (in minutes) after the number of failed log-in attempts specified with Number of failed login attempts until temporary ban.
[cpg1.4.0 or better required]
Enable reports
Enable reports. When set to "yes," this feature will allow users to report on uploaded files or comments to the site admin.
This setting is dependant on e-cards being enabled. Only users who have permission to send e-cards in the 'groups' settings are able to send reports. The report icon is hidden from those not allowed to do so.
[cpg1.4.0 or better required]
4.12.11 Custom fields for user profile (leave blank if unused). Use Profile 6 for long entries, such as biographies
These fields are displayed within the "user profile" area. They will appear only if you assign a name to the field. As instructed in the heading, use field 6 for long entries, such as biographies, or if you want to include the use of bb code.
You can also use field 6 for avatars. To show an avatar in the profile, it should be entered in bbcode, for example to show 'avatar.gif', which is located in your images folder, use the code [img]http://www.yoursite.com/images/avatar.gif[/img]
4.12.12 Custom fields for image description (leave blank if unused)
These fields are displayed within the "file information" area. They will appear only if you give them a name.
4.12.13 Cookie settings
Name of the cookie used by coppermine
Default value is "coppermine". Even if you have multiple instances of the script running on the same server you can keep the default value.
When using bbs integration, make sure it differs from the bbs's cookie name
Path of the cookie used by the script
Default value is "/". Don't change this unless you know what you are doing. This may prevent you from logging in.
If you have broken your gallery by modifying this value, use phpMyAdmin to edit the xxxx_config table in your database and restore the default value.
When using bbs integration into Coppermine, make sure to use different cookie names for coppermine and your bbs! The paths in both applications have to be set so coppermine is able to read both. Usually the default value "/" should be set as path both for coppermine install and the BBS app you bridge with.
4.12.14 Email settings
Usually nothing has to be changed here; leave all fields blank when not sure. Only if you run into problems (e.g. if ecards, registration info or notifications don't get sent) you should change these settings. Coppermine itself doesn't come with an engine to send mails, it relies on a webserver being able to do so (using the built-in mechanisms of PHP). If you're not sure what to enter, ask your webhost for support.
SMTP Host
The hostname of the SMTP server
If you leave this blank, sendmail (or a surrogate) will be used to send emails from your server. Sendmail exists on most Unix/Linux webservers. If you specify a SMTP hostname, Coppermine will try to send emails using SMTP (this usually is needed on Windows webservers).
[cpg1.4.0 or better required]
SMTP Username
The username needed to authenticate on the SMTP server (this is not your coppermine admin username).
[cpg1.4.0 or better required]
SMTP Password
The password that goes with above mentioned username (not identical to your coppermine admin password).
[cpg1.4.0 or better required]
4.12.15 Logging & statistics
Like all logs (that record data that would get dropped if logging was disabled), the logging features of Coppermine will have a slight performance impact as well as an impact on webspace and database usage. You should make up your mind if you actually will need the logs before enabling the feature. A log is only helpful if the admin actually looks into it.
Logging mode
Set, what kind of logging you want to enable. This feature records all changes that are done in coppermine's database, which is especially helpful if you're trying to debug or if there are various admins on a gallery.
All log files are written in english
[cpg1.4.0 or better required]
Log ecards
When enabled, all ecards that are being sent are as well written into the database, where the coppermine admin can view them. Before switching this option on, make sure that logging is legal in your country. It is also advisable to notify your users that all ecards are being logged (preferrably on the registration screen).
[cpg1.3.0 or better required]
Keep detailed vote statistics
Enabling this option records:
- Each vote separately
- IP Address
- Referer
- Browser
- Operating System
of the voter.
As the statistics are being kept per file, the link to the stats can be accessed on the individual file's page (displayimage.php) by clicking the link in the file info section to open the stats pop-up.
Note: The total votes may not match if you enable details and do not reset the earlier votes.
Keep detailed hit statistics
Enabling this option records:
- Each vote separately
- IP Address
- Search Keyword, if the referer is Google, Yahoo! or Lycos search engines
- Referer
- Browser
- Operating System
of the visitor.
As the statistics are being kept per file, the link to the stats can be accessed on the individual file's page (displayimage.php) by clicking the link in the file info section to open the stats pop-up.
Note: The total hits may not match if you enable details and do not reset the earlier hits.
4.12.16 Miscellaneous settings
Enable debug mode
CPG will show error messages which are normally suppressed. This is helpful in troubleshooting problems with your gallery or when asking for help on the CPG Support Forums. Turn this feature off if you don't experience problems.
Turn it on (option "Everyone") if you are requesting help on the coppermine support board, so the supporters can have a look at the debug output as well. Choose the option "Admin only" when troubleshooting on your own - debug output will be only visible when you're logged in as admin, regular users or guests won't see the debug output.
Display notices in debug mode
May be helpful to troubleshoot problems with your coppermine install - only recommended if you know a little PHP and you can understand the additional error messages this option shows. This option only applies if debug mode is enabled.
Gallery is offline
If you have to do maintenance work on your gallery, switch it to offline mode. Only members of the admin group will be able to log in, all other users will only see "Gallery is offline". Remember to switch this option off once your maintenance work is done.
[cpg1.3.0 or better required]
4.13 EXIF data
The "Exchangeable image file" format (Exif) is a specification for the image file format used by digital cameras with the addition of specific metadata tags. The meta data are written by the camera and can be post-processed using certain desktop applications. Coppermine is capable of displaying some of the EXIF data within the pic info section, like date and time information, camera settings, location information, descriptions and copyright information.
4.13.1 EXIF manager
 CPG1.4.x (or better) comes with an EXIF manager that let's the coppermine admin decide what EXIF data should be displayed within coppermine. Please note: if the exif data don't exist within a particular image, coppermine will of course not be able to display them. Coppermine is not an editor for exif data - it just displays the exif data that exists in your pics.
To access the exif manager, go to coppermine's config and click within the section Files and thumbnails advanced settings at "Manage exif display" next to the line "Read EXIF data in JPEG files". Alternatively, you can directly enter http://yoursite.tld/your_coppermine_folder/exifmgr.php into your browser's address bar.
Tick the checkboxes in the exif manager that you want to show up in coppermine's pic info section (if the image file actually holds this particular set of information).
4.14 Plugins
Included in your coppermine setup is one basic plugin:
- Sample plugin: meant for plugin-writers as an example only
You can find more plugins on the Coppermine Support Forum, both from Coppermine developers and from user contributions.
[cpg1.4.0 or better required]
4.14.1 What is a plugin?
Starting from cpg1.4.0, coppermine comes with a plugin API that enables plugin authors to modify coppermine features without hacking the core code, making upgrading easier, as modifications don't have to be re-applied every time you upgrade your coppermine version. It's recommended to use plugins instead of code modifications that require hacking the core code.
4.14.2 The Plugin API
The plugin API consists of several "hooks" all over the core code of coppermine that allows plugin authors to interact with coppermine functions, overriding or adding features. There are limitations to what can be done using a plugin, as the number of hooks is limited. As a result, not every change of coppermine behaviour that could be accomplished by hacking the core code is possible to achieve using the plugin API. However, using a plugin is more elegant and usually much easier to install and get running (at least for the end user) than a crude core code hack. Installing and configuring a plugin doesn't require the coppermine admin to mess with the source code - you simply upload the plugin, install it, configure it and you're done. If the plugin has been coded as suggested and is mature enough, it should come with a configuration screen that makes editing source code irrelevant.
Unfortunately, there is no API documentation available yet.
4.14.3 The Plugin Manager
The plugin manager is the central place from where you upload, install, configure and remove plugins. It can be acceessed in two ways:
- Using Coppermine's navigation:
Log in as admin, go to coppermine's config, expand the "General settings" section, on click "Manage plugins" next to "Enable plugins" (make sure that you have set "Enable plugins" to "Yes") if you plan using plugins. - Directly accessing the plugin manager
Make sure that you are logged in as admin, then directly enter the plugin manager's url in the address bar of your browser, e.g. http://yoursite.tld/your_coppermine_folder/pluginmgr.php
The plugin manager organizes the plugins you have in your Coppermine directory. It is important to understand the difference between uploading plugins and installing plugins. When you copy a plugin to the Coppermine plugins folder (using the Upload button on the plugin manager or via FTP), you have merely uploaded the plugin files. The plugin is not installed yet. When you install a plugin, Coppermine runs the plugin's installation routine to configure and activate the plugin so that it will be executed when people use your gallery. To clearly show which plugins are running and which are not, the plugin manager is separated into two sections (see screen capture below):
- the plugins that are installed and running (upper section)
- the plugins that exist within the plugins folder of your server's hard drive but have not been installed and therefore are not running in your Coppermine gallery (lower section)
By default, coppermine comes with some sample or code plugins (none of them are enabled by default though), additional plugins can be found on the corresponding section of coppermine's forum.
4.14.3.1 Uploading a plugin
Unless you're going to code your own plugins, they usually come packaged up already, compressed into a zip file. There are two options how to upload a plugin:
- Method 1: Using the upload interface on coppermine's plugin manager page
- Download the plugin you need from the internet (usually the coppermine page) to your local hard drive
- Click the "browse" button on the plugin manager page
- Navigate to the plugin zip file you just have downloaded to your local PC's hard drive
- Click "upload"
- PHP running on your webserver needs zip support - not all webserver have zip support enabled.
- the script needs write permissions within the plugins folder.
- Method 2: Uploading the unzipped plugin files using your FTP app
- Download the plugin you need from the internet to your local hard drive (same step as above)
- Unpack the zip file into a folder on your hard drive (preserving the folder structure of the plugin)
- Use your FTP app to upload the unpacked plugin files into the plugin folder of your coppermine install on your server, preserving the structure of the zip archive. For example: if the plugin contained the folder "foobar", which held the actual plugin files, you upload the whole folder "foobar" and all of its contents into the plugins folder. The resulting folder structure on your server should be something like /your_coppermine_folder/plugins/foobar/
After uploading the files (you may need to refresh the plugin manager page), the plugin you just uploaded should show in the list "Plugins Not Installed". If it does, you can continue to the next step and install the plugin.
4.14.3.2 Installing a plugin
Installing a plugin is fairly straightforward - just click on the ![]() -icon next to the plugin. The install will enable the plugin to be executed when coppermine is being run (depending on the plugin's purpose). Some plugins come with a configuration screen that will be executed right after the install - if this is the case, configure it accordingly.
-icon next to the plugin. The install will enable the plugin to be executed when coppermine is being run (depending on the plugin's purpose). Some plugins come with a configuration screen that will be executed right after the install - if this is the case, configure it accordingly.
4.14.3.3 Plugin Configuration
Some plugins may need to be configured during install, others may have a separate configuration page that can be accessed at any time. This depends on how the plugin author wrote the plugin, so we can't give any recommendations within this documentation. Some plugins may even need to be configured before actually being uploaded (especially plugins in alpha or beta stage - these may come without a browser-driven configuration page and require you to modify the plugin's code to configure the plugin). If unsure, take a look in the unzipped plugin archive on your hard-drive - usually, plugins that require you to edit or configure anything come with a README file that tells you how to do so.
4.14.3.4 Uninstalling a plugin
Executing a plugin might be consuming resources or not work as expected, so you might want to uninstall a plugin at some time (maybe because you just tried it out and it doesn't work as expected for you). It's recommended not to just delete the plugin's subfolder using your FTP app (because the plugin might have applied database changes that need to be undone). Instead, you should go to the plugin manager and click on the ![]() -icon next to an active (installed) plugin. The plugin then should get uninstalled and turn up in the list "Plugins Not installed". It's safe to leave the sources of an unneeded plugin on the server, so there should be no need to delete the plugin right after uninstall, however you may as well delete it, especially if you're short on webspace and the plugin eats up a lot of space.
-icon next to an active (installed) plugin. The plugin then should get uninstalled and turn up in the list "Plugins Not installed". It's safe to leave the sources of an unneeded plugin on the server, so there should be no need to delete the plugin right after uninstall, however you may as well delete it, especially if you're short on webspace and the plugin eats up a lot of space.
To finally delete an inactive plugin from your server's plugin folder, click the ![]() -icon next to a plugin that is in the list "Plugins Not installed". If the script fails to delete a plugin this way (because of lacking permissions to do so on file/folder level), you can use your FTP app to delete the particular plugin's sub-folder within coppermine's "plugins" folder (deleting manually). As with all delete operations, you should make a local backup before deleting if you're not absolutely sure what you're doing.
-icon next to a plugin that is in the list "Plugins Not installed". If the script fails to delete a plugin this way (because of lacking permissions to do so on file/folder level), you can use your FTP app to delete the particular plugin's sub-folder within coppermine's "plugins" folder (deleting manually). As with all delete operations, you should make a local backup before deleting if you're not absolutely sure what you're doing.
4.14.4 Writing plugins
As suggested above, there's no documentation available yet for plugin authors, so the only method to learn how plugins work is by looking at the source code. Examine the code of the plugins that come with coppermine, or take a look at some that are available for download from the plugin contributions sub-board on the coppermine web page.
If you accomplished writing a plugin, we ask you to share it with the coppermine community by posting it on the appropriate board (this is of course not mandatory, but we'd appreciate to see your contribution). We would welcome a user-contributed API documentation or a list of hooks as well, or other related documentation.
5. Integrating the script with your bulletin board
5.1 Available bridge files
Coppermine can be integrated with the following bulletin boards (eg. Coppermine and your bulletin board will share the same user database).
- Invision Power Board
- Mambo
- MyBB
- Phorum
- phpBB 2
- PunBB
- SMF 1.x
- SMF 2.x (beta)
- vBulletin
- XMB
- Xoops2
5.2 Pre-requistes
5.2.1 Authentication by cookie
The login integration uses your bulletin board cookies, therefore it won't work if your board cookies are not visible by Coppermine. So unless you are an expert, keep things simple and install Coppermine and your bulletin board on the same domain. Examples :
| This will work: | This won't work: |
| Bulletin board: http://yourdomain.com/board/ Coppermine: http://yourdomain.com/gallery/ |
Bulletin board: http://board.yourdomain.com/ Coppermine: http://gallery.yourdomain.com/ |
The cookie path in the forum's configuration should be set to '/' where this option is available.
Important: the cookie names of your bbs and coppermine must not be the same - they must differ!
5.2.2 Standalone version first
To avoid confusion, make sure to set up both coppermine and your bbs as standalone first. Make sure they both run correctly without integration. Test all features of coppermine (like upload, registration etc.) when Coppermine is installed, before you even start integration.
5.2.3 Coppermine users, groups and pics uploaded by users are lost when integrating
Warning: If you already have users and custom groups in your coppermine database when you enable bbs integration, be aware that they will be lost. If your coppermine users have already created private albums and uploaded pics to them, they will be lost as well!
5.2.4 Backup
Backup: it is very advisable to backup both your coppermine database and your files before enabling bbs integration, so you can safely go back if the integration fails.
In fact you're encouraged to backup your database on a regular base, and especially before applying code changes.
5.3 Integration steps
From cpg1.4.x on you can use the Bridge Manager that will provide a wizard-like interface to enable/disable bridging.
5.3.1 Using the bridge manager
The bridge manager is a new feature in cpg1.4, it is not available in older versions. Instead of manually editing coppermine code files, you can enable/disable bridging in your browser, using a wizard-like user interface. To start the bridge manager, log in as admin, choose "Admin Tools" from the navigation and the "bridge manager"
 If you run the bridge manager for the first time, there will only be one button that let's you actually start the wizard (if you return to the bridge manager later, you will also find a switch to enable/disable bridging) click it.
Note: with each step in the wizard, some information is being written to the coppermine database. Unlike other wizards (mostly on your local machine), the bridge manager doesn't have a ""cancel"-button! Once you have enabled bridging and everything is working fine, you shouldn't change any values just out of curiosity, as they will get written to the database, which might result in a bridging that used to work not working any more after "playing" with it.
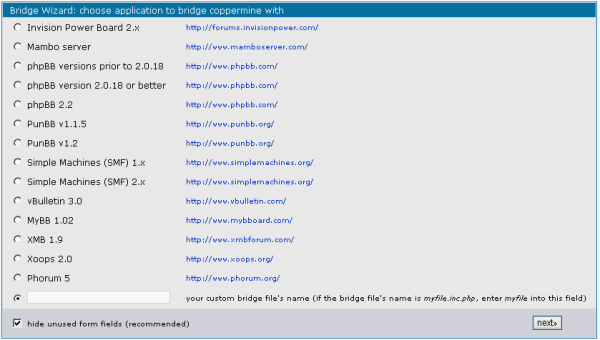 In the first actual step of the wizard "choose application to bridge coppermine with", you have to choose the application you actually want to coppermine with. Note that you must have this application already installed on your webserver, it has to be properly configured and must be up-and-running. Don't use the bridge manager yet if you only plan to integrate coppermine with another application later.
If you have a custom-made bridge file that is not available in the wizard, choose the radio button in front of the text field and enter the name of your bridge file there, without the extension ".inc.php" (the bridge file must reside in the coppermine sub-folder "bridge").
Click "next"
The next steps depend on the application you have chosen to bridge with: some applications need URLs to be entered, or paths. Some need mySQL table information or cookie data to be entered, others don't. The point of the wizard is that it will only "ask" you the relevant settings for your application - if one or more items of the following description doesn't turn up for your application, there's no need to worry - just keep filling in the mandatory information and then hit "next". However, you have to understand that coppermine can proof-check only some of your input - some input goes unvalidated.
If a reset button (![]() ) is being displayed next to an input field, the field value doesn't have the default value. It can be perfectly OK to have a non-default value in a field, however you should keep in mind that if you have "played" with the bridge manager before, previous settings might exist in a field that are not correct - do not light-heartedly skip a step without paying attention to it. Use the reset button to revert to the default value (not necessarily "quor" default value though).
) is being displayed next to an input field, the field value doesn't have the default value. It can be perfectly OK to have a non-default value in a field, however you should keep in mind that if you have "played" with the bridge manager before, previous settings might exist in a field that are not correct - do not light-heartedly skip a step without paying attention to it. Use the reset button to revert to the default value (not necessarily "quor" default value though).
5.3.1.1 choose application to bridge coppermine with
- Invision Power Board
- Mambo
- MyBB
- phpBB 2
- Phorum
- PunBB
- SMF 1.x
- SMF 2.x
- vBulletin
- XMB
- Xoops2
5.3.1.2 path(s) used by your BBS app
- Forum URL
Full URL of your BBS app (including the leading http:// bit, e.g. http://www.yourdomain.tld/forum/) - Relative forum path
Relative path to your BBS app from the webroot (Example: if your BBS is at http://www.yourdomain.tld/forum/, enter "/forum/" into this field) - Relative path to your BBS's config file
Relative path to your BBS, seen from your Coppermine folder (e.g. "../forum/" if your BBS is at http://www.yourdomain.tld/forum/ and Coppermine at http://www.yourdomain.tld/gallery/)
5.3.1.3 BBS-specific settings
- Use post-based groups?
Should Coppermine import the special groups that exist in the forum ? If you select no, then Coppermine will use the standard groups (Administrator, Registered and Anonymous) which makes administration easier and is recommended. You can change this setting later as well.
5.3.1.4 enable/disable BBS integration
This is the last step of the bridge manager - it summarizes up the settings you have made in previous steps - you can enable or disable integration here. By default, integration is set to "disabled" after the bridge manager has been run for the first time. You should only enable integration if you're sure your BBS app is set up correctly. Click the "Finish" button in any case to finally write to the database, even if you choose to keep the current settings (leaving integration "disabled").
- Enable integration/bridging with XXX
[cpg1.4.0 or better required]
5.3.2 Recover from failed bridging
If you have provided improper settings using the bridge manager, your integration might fail, resulting (in the worst case) in a stituation where bridging is enabled, but you can not log in as admin to switch it off again (e.g. if you provided improper cookie settings that stops authentication from working). For this situation a recovery setting was built into the bridge manager: if you are not logged in as coppermine admin (in fact: not logged in at all) and you access the URL of your bridge manager (http://yourdomain.tld/your_coppermine_folder/bridgemgr.php) by entering it manually into the address bar of your browser, you are prompted to enter your admin account details - use the admin account you used to install coppermine with in the first place (the standalone admin account). This will not log you in, but switch integration off, so you can fix improper bridging settings then. To avoid others trying to guess your admin account details, there's a login treshold that rises every time you enter wrong credentials, so enter your admin account details with care.
[cpg1.4.0 or better required]
5.3.3 Synchronising the bbs groups with Coppermine's groups
Login using the admin account of your board. Go to the gallery, enter admin mode and click on the "Groups" button. This will synchronize Coppermine groups with those of your board. The permission you will see for each group will be completely messy, so take some time to set them properly.
Each time you add or delete a group in your board you will need to do the operation above in order to keep the synchronisation of the groups.
When you will try to login / logout or manage users from Coppermine, you will be redirected to the corresponding page of your bulletin board. Once the login or logout is performed you won't be redirected automatically to the gallery because your board does not have any function for that. It's up to you to add a link on your board to get you back to the gallery.
It's mandatory that you (as admin) go to the groups page directly after bridging or whenever you change anything in your bridging configuration or if you change anything in your groups settings on your bbs, as you need to trigger the re-sync.
5.4 Bridging support
With the explanations given above you should be able to bridge your (BBS) application with Coppermine. However, if things don't work as expected, you're welcome to look for help using the coppermine support board. When asking for support, please keep in mind that the supporters will need some information to enable them to help you:
- Search the board before posting - maybe somebody had similar issues to yours that have been solved already
- Post on the board that deals with your version - bridging mechanisms have changed from version to version, that's why it's important to post on the board that actually corresponds to your coppermine version
- Don't hijack threads - when looking for bridging support, start your own thread
- Read the sticky threads before posting
- Make sure you are using the latest versions of the bridging files, they are kept up to date between formal Coppermine releases. Download the relevant files from the SVN. Update udb_base.inc.php and the file that corresponds to the bridge you are using and upload them into your bridge directory, overwriting the old ones. Of course you should make sure to use the most recent stable coppermine release in the first place.
- When requesting bridge support, please post a link to your site, a test user account, and what you have set in the bridge manager.
Make sure that the test user account doesn't have admin privileges. When posting parts of your bridge file, make sure to replace passwords with asterisks.
This is how your posting should look like (with actual URLs instead of the dummy URLs given here as an example):
I have the following issue when trying to bridge coppermine and XXX:
[error message here]

Coppermine install: http://mysite.tld/my_coppermine_folder/
Forum install: http://mysite.tld/my_forum_folder/
Coppermine version: cpgX.Y.Z
Forum version: SuperDuper BBS app v0.8.15
Test user account: some_testuser_name / the_password_for_the_test_user_account

BridgeManager settings:
Forum URL:  http://mysite.tld/test/foo_bar
Relative path to your BBS's config file:  ../bla/
Use post-based groups?:  0
6. Translating Coppermine into other languages
Coppermine has a separate language file that make the translation of the script much more easy. The language files are stored in the lang directory.
If you select an utf-8 language file as the default one, then the script will be able to automatically select a language file based on the visitor browser configuration. For instance if the default language file is danish (utf-8) and an english visitor accesses your gallery, the english language file will be used by the script.
If you have translated Coppermine into a language not already supported, please read the translator's guide and visit the Coppermine Web Site and follow the instructions for submitting your language.
7. Known Issues
The following slight quirks and tiny issues are known and will hopefully be fixed in future releases.
- The arrows used for navigation from one pic to the other display in the wrong order for rtl-languages
- Keyword list returns incorrect result for asian characters
- Browser bug: IE displays 100%-width values incorrectly
- New batch-add interface doesn't work on all server setups. Users who have issues with it should use the classic interface instead.
- Missing Query in debug output: the value for $CONFIG['debug_mode'] is not yet set before the first query to the config table
- Page tabs in user manager don't behave in the same way as other tabs
- Resizing gif/png with transparent background doesn't preserve alpha info
- Weird characters on mouseover tooltips in other browsers than IE
- Wrong charset in emails sent from coppermine
- Language fallback not working for util.php and faq.php
- Hardcoded charset in xp_publisher.php
- Thumbnail sizes over 120px causes edit fields to run over its edge
- No album thumbnails for albums that contain only pics linked by keyword
- Possible stability issues with PHP5 and plugins
- Crop/rotate doesn't work with GD1
- Rotate causing distorted image for large files
- Search Engine Friendly URLs plugin is not working flawlessly, it's still experimental
- <object><param></param></object> construct for multimedia files doesn't validate but is needed for backwards compatibility
- Nuke check in installer needs improvement
- EXIF and IPTC information are lost when rotating
- Banned group doesn't work as expected
- Album created using XP publisher despite upload failure
- Hebrew translation still incomplete
- No category thumbnail for user galleries and categories that don't contain albums with pics in it, but only sub-categories
- SEF plugin breaks custom sort order
- Editpics and editOnePic allow users to move files from a personal gallery to a public album without approval where approval is required
- Editpics and editOnePic allow users to move files from a personal gallery to a public album without notice where they might not be able to edit the file
8. Credits
8.1 Coppermine team
| Developer | Username | Role/Position | Status |
| Dr Tarique Sani | tarique | Lead Developer | active |
| Abbas Ali | abbas | Developer | active |
| Aditya Mooley | Aditya | Developer | active |
| Donovan Bray | donnoman | Developer | active |
| Tommy Atkinson | Nibbler | Developer | active |
| Dave Kazebeer | kegobeer | Supporter | active |
| Thomas Lange | Stramm | Developer | active |
| Thu Tu | TranzNDance | Supporter | active |
| Paul Van Rompay | Paver | Developer | active |
| Amit Badkas | Amit | Developer | active |
| Andreas Ellsel | Andi | Tester | active |
| Developer | Username | Role/Position | Status |
| Grégory Demar | Greg | Original creator of Coppermine | retired |
| Jack | datajack | Developer | retired |
| DJ Axion | djaxion | Developer | retired |
| Scott Gahres | gtroll | Developer | retired |
| Hyperion | hyperion01 | Developer | retired |
| John Asendorf | jasendorf | Developer | retired |
| Jay Hao-En Liu | Oasis | Developer | retired |
| Christopher Brown-Floyd | omniscientdeveloper | Developer | retired |
| Timothy | skybax | Developer | retired |
| David Holm | wormie_dk | Developer | retired |
| Mark Zerr | zarsky99 | Tester | retired |
| mitirapa | mitirapa | Porter (Cross Platform Devel.) | retired |
| Moorey | moorey | Web Designer | retired |
| Maarten Hagoort | DJ Maze | Developer (nuke team) | retired |
| Joachim Müller | gaugau | Project Manager | retired |
| Eyal Zvi | EZ | Developer | retired |
| Clive Leech | casper | Supporter | retired |
| Dennis Nakano | madeinhawaii | Supporter | retired |
| Roberta | Blueiris | Supporter | retired |
8.2 Contributors
| DaMysterious | DaMysterious has created loads of fantastic themes for Coppermine |
| Nanobot | Doug has done the vBulletin v3 bridge file |
| Girish Nair | Girish has contributed to the film strip feature |
| Jason Kawaja | Jason did the memberlist hack |
| Alexander Löbel | Alex did the translation of the FAQ in German |
| Joe Ernst | Joe has contributed the "Sort my pictures" feature |
| Pascal Yap | Pascal is a moderator of the French support board and has contributed several mods and hacks. He has translated the FAQ into French. |
| François Keller | Frantz is a moderator of the French support board and has contributed several mods and hacks. He is co-author of the translation of the FAQ into French as well as the French language file for cpg1.4.x. |
| Leny | Leny has come up with the partial translation of the documentation into Spanish. |
| Robert Chapin | Robert Chapin (miqrogroove) has re-done the bridge file for XMB. |
There is a full list of translators that can be found on the coppermine homepage: please visit Coppermine-gallery.net > About > Translators.
8.3 Coppermine uses code from the following free softwares :
phpBB
Author: phpBBGroup
URL: http://www.phpbb.com/
License: GNU GPL
phpMyAdmin
Author: phpMyAdmin devel team
URL: http://www.phpmyadmin.net/
License: GNU GPL
phpPhotoAlbum
Author: Henning Støverud
E-mail: henning AT stoverud DOT com
URL: http://www.stoverud.com/PHPhotoalbum/
License: GNU GPL
TAR/GZIP/ZIP Archive Classes
Author: Devin Doucette
E-mail: darksnoopy AT shaw DOT ca
License: GNU GPL
Exifixer
Author: Jake Olefsky
URL: http://www.offsky.com/software/exif/index.php
License: GNU GPL
Codelifter Slideshow
URL: http://www.codelifter.com
License: free for all, as long as copyright information stays intact
PHPMailer
Author: PHPMailer Team
URL: http://phpmailer.sourceforge.net/
License: LGPL
PHP Calendar Class Version 1.4
Author: David Wilkinson
E-mail: davidw AT cascade DOT org DOT uk
URL: http://www.cascade.org.uk/software/php/calendar/
License: free for all, as long as copyright information stays intact
8.4 Copyright, license and disclaimer
8.4.1 License
This application is opensource software released under the GNU GPL, version 3.
Versions prior to cpg1.4.13 used to be released under GNU GPL version 2. As the Free Software Foundation has released version 3 of the license, we updated the license reference for this release accordingly.
Subsequently, all versions of Coppermine from that time on (July 2007) will be released under GNU GPL version 3.
8.4.2 Additional terms (license add-ons)
The GNU GPL does not allow further restrictions of permissions except the additional terms that can be added according to section 7 of the GNU GPL v3.
Coppermine is being released under the GNU GPL with the following, GPL-compliant additional terms:
8.4.2.1 Disclaimer
According to GNU GPL v3, section 7 a)
Because the program is licensed free of charge, there is no warranty for the program, to the extent permitted by applicable law. Except when otherwise stated in writing the copyright holders and/or other parties provide the program "as is" without warranty of any kind, either expressed or implied, including, but not limited to, the implied warranties of merchantability and fitness for a particular purpose. The entire risk as to the quality and performance of the program is with you. Should the program prove defective, you assume the cost of all necessary servicing, repair or correction.
8.4.2.2 Preservation of author attributions
According to GNU GPL v3, section 7 b)
The Coppermine group (aka Coppermine Dev Team) requires the preservation of the "Powered by Coppermine" footer in a legible, unobscured manner in the output of all pages generated by Coppermine-driven galleries.
This policy may be subject of change in future versions. It has originally been made a requirement by the initial author of the first version of Coppermine. We ask you (the end user) to respect this policy and keep the footer intact. Additionally, we have a strict policy on the Coppermine support forum that galleries with the footer tag removed will not receive support. We're convinced that you should give credit where credit is due. We ask you to think twice before removing the tag, as it is meant to spread the word about Coppermine and give others who like your Coppermine-driven gallery to get one of their own.
In previous versions (prior to cpg1.4.13) of Coppermine (which used to be covered by the GNU GPL v2), the additional term that the footer should not be removed existed as well. There have been third parties though who doubted the rightfulness of this additional term and subsequently claimed that it was legal to remove the tag; some of those third-parties even offered instructions how to accomplish this code-wise (although the legal details had been clarified long before with the Free Software Foundation and the Open Source Initiative). The Coppermine Dev Team welcomes that version 3 of the GNU GPL clarifies this legal aspect and demands of any third parties to respect the full license, including the additional terms covered in this section of the documentation.
8.4.2.3 Marking of modified versions
According to GNU GPL v3, section 7 c)
The Coppermine Dev Team requires as additional term of the license Coppermine comes with that modified versions of Coppermine conveyed to others should be marked in a reasonable way. Modified versions mustn't be conveyed to others under the same name as the original coppermine release. Package name, source code and the output generated by the modified version should make it obvious for potential users that the modified version and the original coppermine version that the modified version is based upon differ.
Examples:
- Coppermine - coffee edition
- Coppermine with Coffe-Support
- Coppermine ported for CoffeeMaker v1.8
Explanation:
If you download Coppermine and modify it for the use on your webspace, you don't have to rename it - the above mentioned additional term does not apply to you. It only applies if you make your modified version available for others for download or other means of distribution.
We think that this helps both the Coppermine project as well as the author of the modified version: people who are using the modified version can find out easily where they can turn to for help. The author of the modification get get the credit he deserves. The Coppermine Dev Team can make sure that issues caused by third-party modifications have less impact on the reputation of the original package.
8.4.3 Copyrights
Coppermine Photo Gallery is Copyright © 2002 - 2007 Grégory DEMAR and the Coppermine Dev Team, All Rights Reserved.